training-labs
Intro to Classes in C++
Objective
By engaging with this demonstration, you should be able to:
- write code that accomplishes a periodic task without using
delay() - understand basic advantages of C++ classes
- explain the syntax of writing a C++ class
- identify code that is reusable
- develop a small library to reuse code for “things” in a C++ class
Materials
Please watch the videos in this playlist for this demonstration. Clarifications to the videos appear below.
The soure code used is on TinkerCad. That source code is public domain, though the actual Arduino libraries are very likely released under different terms.
C++ Class Fundamentals
C++ Classes/Objects
C++ is an object-oriented programming language. Everything in C++ is associated with classes and objects, along with its attributes and methods. For example: in real life, a car is an object. The car has attributes, such as weight and color, and methods, such as drive and brake. Attributes and methods are basically variables and functions that belongs to the class. These are often referred to as “class members”. A class is a user-defined data type that we can use in our program, and it works as an object constructor, or a “blueprint” for creating objects.
Example code of creating a C++ class from the video tutorial
Insider the header file, create a class called “BlinkingLED”:
class BlinkingLED {    // The class

   int myNum;        // Attribute (int variable)
   public:             // Access specifier
   void attachPin(int newPin) // Method/function defined inside the     class
   void blink();
};
Create a library in Arduino
You need at least two files for a library: a header file (w/ the extension .h) and the source file (w/ extension .cpp). The header file has definitions for the library: basically a listing of everything that’s inside; while the source file has the actual code. We’ll call our library “blinkingled”, so our header file will be “blinkingled.h”.
#include "Arduino.h"
#ifndef BLINKINGLED_H
#define BLINKINGLED_H

class BlinkingLED {    // The class

   int myNum;        // Attribute (int variable)
   public:             // Access specifier
   void attachPin(int newPin) // Method/function defined inside the     class
   void blink();
};
Then, to implement the actual function of the BlinkingLED class, source file is created as “blinkingled.cpp”. The BlinkingLED:: before the name of the function says that the function is part of the BliningLED class and the real functionality is defined in the following code under blinkingled.cpp source file.
void BlinkingLED :: attachPin(int newPin){
    pin = newPin;
}
C++ Inheritance
In C++, it is possible to inherit attributes and methods from one class to another. We group the “inheritance concept” into two categories:
-
derived class (child) - the class that inherits from another class
-
base class (parent) - the class being inherited from To inherit from a class, use the : symbol.
In the example below, the SlowBlinkingLED class (child) inherits the attributes and methods from the BlinkingLED class (parent):
class BlinkingLED {    // The class

   int myNum;        // Attribute (int variable)
   public:             // Access specifier
   void attachPin(int newPin) // Method/function defined inside the     class
   void blink();
};

class SlowBlinkingLED : BlinkingLED{
    public:
      virtual void blink() override;
};

class FastBlinkingLED : BlinkingLED{};
C++ Virtual Function and Override
A virtual function (also known as virtual methods) is a member function that is declared within a base class and is re-defined (overridden) by a derived class. When you refer to a derived class object using a pointer or a reference to the base class, you can call a virtual function for that object and execute the derived class’s version of the method.
Virtual functions ensure that the correct function is called for an object, regardless of the type of reference (or pointer) used for the function call. They are mainly used to achieve Runtime polymorphism. Functions are declared with a virtual keyword in a base class. The resolving of a function call is done at runtime.
In the example below, the virtual function blink() is overridden in the child classes SlowBlinkingLED and FastBlinkingLED in the “blinkingled.h” header file,
class BlinkingLED {    // The class

   int myNum;        // Attribute (int variable)
   public:             // Access specifier
   void attachPin(int newPin) // Method/function defined inside the     class
   void blink();
};
class SlowBlinkingLED : public BlinkingLED{

      public:
      virtual void blink() override;
};
class FastBlinkingLED : public BlinkingLED{
     public:
     virtual void blink() override;
};
Then, the actual blink() functions are then redefined in the source file “blinkingled.cpp”. The blinking led function became modularized and more reusable to switch the led blinking speed.
void SlowBlinkingLED :: blink(){
    static uint32_t lastTime = 0;
    if (milis() – lastTime > 2000){
    digitalWrite(pin, !digitalRead(pin));
    lastTime = milis();
}
Clarifications
What are digitalWrite(pin, value) and digitalRead(pin)?
digitalWrite() and digitalRead are ways to set and get values of
pins. The pin has to be physically set to an output (i.e. by pinMode(pin, OUTPUT))
for the value set by digitalWrite() to do something. For example, here is
a sketch that turns on the built in LED, waits for a second, and then turns
the LED off if it is on.
void setup(){
    pinMode(LED_BUILTIN, OUTPUT);
    digitalWrite(LED_BUILTIN, 1);
    delay(1000)
    if(digitalRead(LED_BUILTIN)) //on is true/nonzero, off is false/zero
        digitalWrite(LED_BUILTIN, 0);
}

void loop(){}
What do // and /* */ mean?
Those are comments. Everything to the right of // on a line will be ignored
by the compiler. The compiler will also ignore everything in between /*
and */.
How do I create a new TinkerCad circuit?
Go to your dashboard. Click on “Circuits”, and click on “Create new Circuit”.
Printing to the Serial Monitor
There is a serial monitor at the bottom left of the TinkerCad code pane.
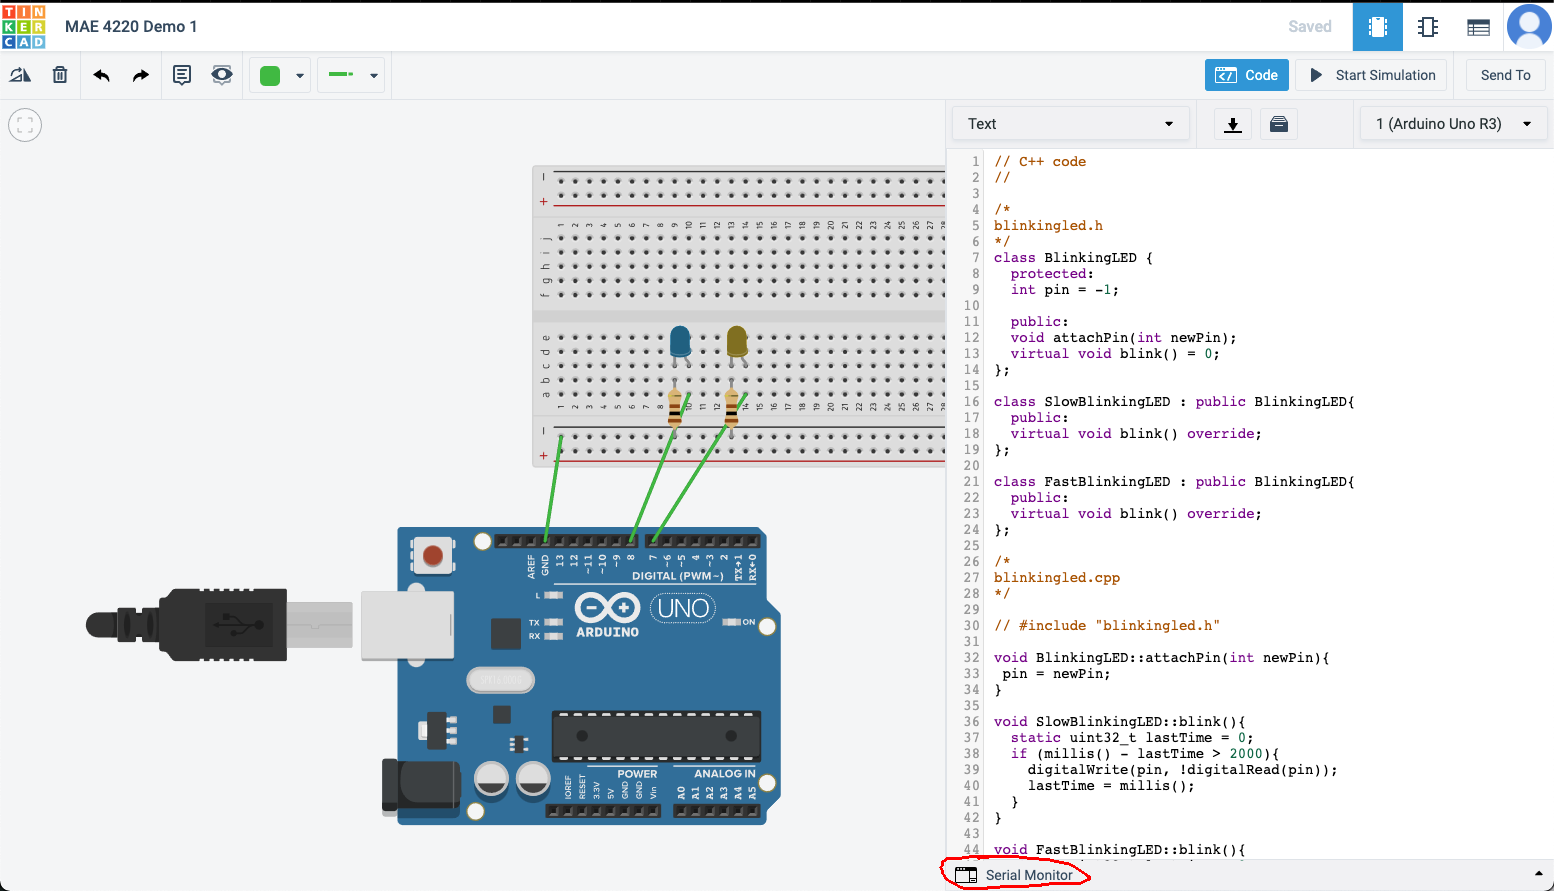
To use it, call Serial.begin(115200); to start Serial. A good place
to call begin() is in your setup() function.
You can then call Serial.print() or Serial.println() to print to
the Serial Monitor. You may print() many different kinds of variables:
strings, ints, floats, and more. Feel free to read the Arduino documentation for
more specifics. Below is an example that will print
Hello World
34
3.14
to the Serial Monitor
void setup(){
    Serial.begin(115200);
    Serial.println("Hello World");
    Serial.print(3); Serial.println(4);
    Serial.println(3.14);
}

void loop(){}
Task
Please create a small library (a .h and .cpp file) that represents something you find interesting. Use your library in a .ino file. Create an instance of all of your derived classes and use all of the functions that you implemented. Test it on TinkerCad and submit 1) the .h, 2) .cpp, 3) .ino files, and 4) a screenshot of the TinkerCAD serial monitor in a single zip folder.
The library must:
- Define a base class which has:
- Some sort of member data with a scope that you justify.
- A function that should “make sense” for all subclasses to inherit.
- A function that makes more sense if subclasses provide specific implementations.
- It is your choice whether the base class provides a default implementation or forces subclasses to provide their own.
- Define two derived classes which inherit from your base class.
- Those classes must provide specific implementations for appropriate functions.
For example, your base class could be an Animal class. All Animals
can printName(), but they speak() in different ways. Think about how
a Dog or a Cat would speak() by printing a string describing
the sound.
A Vehicle class could also be a base class. You could printMass() for
all Vehicles, but perhaps some vehicles have a printFuelType() of
“electricity” or “diesel”.
Please, feel free to make a class that is not an Animal or a Vehicle.
Be creative if you want!