training-labs
Lab 2: Reorganizing Temperature Sensor Code Using C++ classes
The goal of this lab is to develop the object-oriented C++ skills required to use the MCCI Arduino-LoRaWAN library to send data using the Feather’s radio in a future lab. You will practice those skills by writing a small temperature sensor library. Your development of your familiarity with C++ classes enables code reuse, improves efficiency, and simplifies program maintenance and modification. Those advantages are particularly beneficial in the team projects.
Lab Excercise 2
By completing this lab, you will be able to:
- Organize your Lab 1 temperature sense code into C++ classes.
- Examine a C++ header file to determine how you may use that class, and whether futher specialization of that class is necessary for your task.
Materials
Same as Lab 1 (reprinted below)
- Tiny Breadboard
- Feather M0+ LoRa board
- Jumper Wires
- PANE 103395 thermistor
- MCP9808 breakout board
- MicroUSB Cable
Helpful Starter Code
There is helpful starter code here. You can unzip that folder and open it in Arduino.
Prelab Review
Please review the C++ object oriented programming slides as necessary during this lab.
Start a TemperatureSensor Base Class
You used the Arduino Adafruit_MCP9808 class in Lab 1, but we skipped over
the context at the time. When you instantiate an instance of Adafruit_MCP9808 as below
#include "Adafruit_MCP9808.h"

// Create the MCP9808 temperature sensor object
Adafruit_MCP9808 tempsensor = Adafruit_MCP9808();
void setup(){/*Setup stuff*/}
void loop(){/*Loop stuff*/}
you are able to begin() tempsensor with an address (more on I2C addresses later).
You can also wake() tempsensor to when you are ready to take temperatures,
shutdown_wake(1) when you are done taking temperatures, and possibly more
things. If we wanted a second Adafruit_MCP9808, we could
define Adafruit_MCP9808 otherTempsensor;, and now we would have two Adafruit_MCP9808s.
We want to read temperature, and to
allow us to reuse our code more easily, we will write a TemperatureSensor
class.
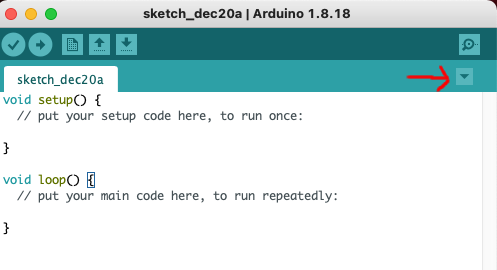
Below the Serial Monitor button, there is a downward arrow icon that allows you to make a “New Tab.” That allows you to make new files in the sketch directory.
Make temperaturesensor.h and temperaturesensor.cpp.
Your class definition should be in the header file, while implementations
should go in the cpp file.
Aside: What are .h and .cpp? Header files (usually ending in
.h) declare what you can “do” with a class. For example,"Adafruit_MCP9808.h"declaresbegin()andwake().Implementation files (usually ending in
.cpp) define how a class accomplishes its tasks. For example, the ArduinoServolibrary has a copy ofServo.cppfor several types of microcontrollers. AVR 8-bit microcontrollers like the ATMEGA328p on the Arduino Uno use one specific implementation, while SAMD microcontrollers like the ATSAMD21G18 on the Feather M0+ LoRa board that this lab was written for use a different implementation. The Arduino build system chooses the correct implementation when compiling.
We will define below what a temperature sensor “does” (in temperaturesensor.h).
We will define a purely virtual “default” TemperatureSensor class
and a specific PANE103395_VD class.
The TemperatureSensor class defines the functions that all TemperatureSensors have in common.
All temperature sensors have a begin() function and a getTemperature()
function that returns a double.
The “virtual” keyword before a function signals that code written for a TemperatureSensor
will use a specific version of getTemperature if one exists (such as the one
written for PANE_103395_VD), rather than the default.
/*
Starter file temperaturesensor.h
*/

#ifndef TEMPERATURESENSOR_H
#define TEMPERATURESENSOR_H
#include <cstdint>

/**
 * "default" temperature sensor
 */
class TemperatureSensor {
  //Public members are accessible from other files
  public:
  virtual void begin();
  virtual double getTemperature() = 0;
  // We _can_ getTemperature() and receive a double, but we don't know how specifically.
  // Setting getTemperature() = 0 forces us to write a specific getTemperature()
  // function for every specific TemperatureSensor.
};
Create a Thermistor Derived Class
Under the same header file temperaturesensor.h, we will define an inherited class that specifies the type of temperature sensor. In this case, we created a derived class called PANE103395_VD
class PANE103395_VD:public TemperatureSensor { //a specific type of temperature sensor
  double mFixedRVal = 10000;
  double mR25C = 10000;
  public:
  virtual double getTemperature() override;
  // override signals that getTemperature() from PANE103395_VD replaces the default
  void setFixedResistor(double newR);
};

//Here, we can specify other TemperatureSensors with their own versions of functions.

#endif
Specialize for the PANE 103395 thermistor
We will define below how a PANE 103395 temperature sensor reads temperature (in
temperaturesensor.cpp). We start by including necessary libraries.
/*
Starter file temperaturesensor.cpp
*/
#include <cmath> //standard libary to give some important math functions
#include "temperaturesensor.h"
#include "Arduino.h" //need this if you want to use Arduino functions like analogRead(pin)

using std::log; //Whenever we call log(something), the compiler knows to use std::log
using std::pow;
We can move the helper functions from Lab 1 into the temperaturesensor.cpp file,
and we can easily implement the getTemperature function by using the body
of the Lab 1 getTemperature function. Note that PANE103395_VD::getTemperature
is needed to tell the compiler that getTemperature is supposed to be a
class function. Also, to avoid hard-coding the analog pin number we want to read from, we define a const int for that pin before any function declarations.
const int PIN = A0;
//rest of your code

double PANE103395_VD::getTemperature(){
  double thermRes = getUnknownResistor(3.3, (3.3/1024)*analogRead(PIN), mFixedRVal);
  return tempFromResistance(thermRes/mR25C);
}
We also add an empty begin() implementation in the cpp file:
void TemperatureSensor::begin(){}
After we complete all the necessary methods and attributes in the cpp file, we could instantiate a PANE103395_VD object in the .ino script.
void TemperatureSensor::begin(){}
#include "Adafruit_MCP9808.h"

// Create the PANE103395_VD temperature sensor object
PANE103395_VD thermistor = PANE103395_VD();
void setup(){/*Setup stuff*/}
void loop(){/*Loop stuff*/}
I2C Temperature Sensor
Sometimes, it is desirable to use a digital sensor. The MCP9808 is a digital temperature sensor that uses a two-wire interface. Inter-integrated circuit (I2C, “I squared C”) and SMBus are branded examples.
I2C allows multiple sensors to cooperate using just two wires. Each sensor only sends data when addressed by the microcontroller. Sensors ignore any requests not addressed to them.
To physically connect an I2C peripheral device, connect the corresponding 3V/VDD, GND, SCL, and SDA terminals on the microcontroller and I2C peripheral.
While the MCP9808 has a premade library available, we will interface briefly with it using the Arduino Wire library before using the premade library.
Wire is an instance of class TwoWire whose partial definition
appears below:
(Don’t copy class TwoWire into your code. It is already built-in!)
class TwoWire : public Stream
{
  public:
    TwoWire(SERCOM *s, uint8_t pinSDA, uint8_t pinSCL);
    void begin();
    void end();

    void beginTransmission(uint8_t);
    uint8_t endTransmission(void);

    uint8_t requestFrom(uint8_t address, size_t quantity);

    size_t write(uint8_t data);
    size_t write(const uint8_t * data, size_t quantity);

    uint8_t read();

    //Other functions and variables here.
};
You must call begin() before reading or writing using Wire. We will
start Wire and read a register of the device. Many I2C devices ‘‘listen’’
for register addresses and then respond with the register contents when queried
with requestFrom. We will write the number 6, which is the address of
a register that always reads 0x54. A code snippet that does that resides below.
The comments say where lines should go. For lines that belong in a function,
setup and loop are both sufficient. You’ll end up removing these
lines because the objective is simply to explore what goes on inside premade
libraries.
//Outside of functions:
#include "Wire.h"
//That is needed to use the Wire library

//Put this in a function
Wire.begin();
Wire.beginTransmission(0x18); //Default address is 0x18.
Wire.write(0x06); //7?
Wire.endTransmission();//actually write the queued data

uint16_t d_id;
Wire.requestFrom(0x18, 2);


uint8_t * t_p = (uint8_t *) &d_id;
while (Wire.available()){
  * t_p = Wire.read();
  t_p++;
}

Serial.print("Manufacturer id: 0x");
Serial.println(d_id, HEX);
Check to make sure that the manufacturer id is 0x54. Then, you can
#include <Adafruit_MCP9808.h> and make
class MCP9808_I2C:public TemperatureSensor. The Adafruit MCP9808 example
mcp9808test gives an example of how to set up and read from that sensor.
You can find examples by going to File->Examples->Adafruit MCP9808->mcp9808test.
All of the functions you need appear in that example. Here is some skeleton
code to get you started.
//Place this in your temperaturesensor.h
#include <Adafruit_MCP9808.h>
//...Other stuff

class MCP9808_I2C:public TemperatureSensor { //another specific type of temperature sensor
  Adafruit_MCP9808 & mDigitalTempSensor;
  public:
  MCP9808_I2C() = delete; //You need to give your MCP9808_I2C an Adafruit_MCP9808 to work with.
  MCP9808_I2C(Adafruit_MCP9808 & digitalTempSensor);
  virtual void begin() override;
  virtual double getTemperature() override;
};
Aside: Code breakdown
Class Inheritance:
MCP9808_I2C : public TemperatureSensorspecifies thatMCP9808_I2Cis a derived class of theTemperatureSensorclass. It inherits all ofTemperatureSensor’s properties and methods (unless overridden).
Reference to Adafruit_MCP9808:
The & symbol in
Adafruit_MCP9808 & mDigitalTempSensormeans thatmDigitalTempSensoris a reference to an instance of theAdafruit_MCP9808class.
A reference is like an alias for an existing variable or object, meaning
mDigitalTempSensormust be initialized with an existingAdafruit_MCP9808object when anMCP9808_I2Cobject is created. It also means thisMCP9808_I2Cinstance doesn’t hold its own separate copy ofAdafruit_MCP9808it’s using an external instance.
Delete Default Constructor
MCP9808_I2C() = deleteexplicitly deletes the default constructor. This ensures that anMCP9808_I2Cobject cannot be created without providing anAdafruit_MCP9808 instance. If you try to instantiateMCP9808_I2Cwithout arguments, you’ll get a compile-time error.
Constructor with Reference Parameter
MCP9808_I2C(Adafruit_MCP9808 & digitalTempSensor)is the class’s constructor, taking a reference to anAdafruit_MCP9808object as a parameter.
This allows
MCP9808_I2Cto be constructed with an existingAdafruit_MCP9808object, which it will use for temperature sensing. This reference is then stored inmDigitalTempSensor, allowing the class to interact with the sensor object.
Please use the skeleton code below and implement the specified methods in the derived class in your temperaturesensor.cpp file.
//Place this in your temperaturesensor.cpp
//...stuff from earlier in the lab
/*
This uses an *initializer list* to initialize mDigitalTempSensor.
You don't need to change this function.
*/
MCP9808_I2C::MCP9808_I2C(Adafruit_MCP9808 & digitalTempSensor):
  mDigitalTempSensor(digitalTempSensor)
  {}

  void MCP9808_I2C::begin(){
  //you will implement this
  /*
    Hint: Check your lab 1 setup() function for how you "began" the
    MCP9808.
  */
}

double MCP9808_I2C::getTemperature(){
  //you will implement this
  /*
    Hint: You should use mDigitalTempSensor (which is an Adafruit_MCP9808)
    to get the temperature.
  */
}
How to use your MCP9808_I2C
In your sketch file (i.e. mae4220_lab2_demo.ino), you need to instantiate
an MCP9808_I2C by passing it an Adafruit_MCP9808. This can be
done at the global scope.
//Global scope, outside of all functions
Adafruit_MCP9808 digitalTempSensorRaw;
MCP9808_I2C digitalTempSensor(digitalTempSensorRaw);
/*
The line above is shorthand for:
MCP9808_I2C digitalTempSensor = MCP9808_I2C(digitalTempSensorRaw);
*/
Hints on how to use Adafruit_MCP9808 based on library code example:
- Where can you call
digitalTempSensorRaw.begin(0x18)? You can call it insetup(), or you can call it in an overriddenMCP9808_I2C::begin()function. You need to initialize the MCP9808 before you can use it. - Can you make your themistor and digital sensor examples return similar values? i.e. all give values in degrees C, degrees F, or K
Comparison of Temperature Sensors
We have one more class to use for this review. Be sure to include your temperaturesensor header if in a different file.
class TemperatureComparator{
  TemperatureSensor * mine;
  public:
  TemperatureComparator() = delete; //You need to give temperatureComparator a temperature sensor
  TemperatureComparator(TemperatureSensor * a);
  void doCompare(TemperatureSensor & other);
};
Here are some starter implementations of functions to put into temperatureComparator.cpp:
/*
  Starter file: temperatureComparator.cpp
*/
#include "temperaturesensor.h"
#include "Arduino.h"


//Empty
TemperatureComparator::TemperatureComparator(TemperatureSensor * a):mine(a){}

void TemperatureComparator::doCompare(TemperatureSensor & other){
      Serial.print("mine: ");
    Serial.print(mine->getTemperature());
    Serial.print(" other: ");
    Serial.println(other.getTemperature());

    //Please do something interesting here: your choice.
}
The idea here is just to do something interesting in the doCompare().
Maybe you can take a running average of the difference and print a message
when the difference is large enough. The key takeaway in this example is that
the TemperatureComparator does not need to know what kind of
TemperatureSensor it is using. The virtual functions take care of
calling the correct implementation of getTemperature().
How to use a Temperature Comparator?
We need to instantiate a TemperatureComparator by passing it the memory
address of a TemperatureSensor. One way to do that is to instantiate
some kind of TemperatureSensor and use & to get its memory address
to pass to TemperatureComparator.
//This is outside of any function, in the "global scope."
PANE103395_VD thermistor;//This is a TemperatureSensor
TemperatureComparator comparator(&thermistor);
We can then call doCompare(other), say, in the loop() function.
  loop(){
    comparator.doCompare(thermistor);
    delay(1000);
  }
Aside: Performance
log()and floating point exponentiation can potentially use up a lot of CPU resources. If we wanted higher speed instead of higher accuracy, we could use a linear or piecewise linear approximation instead. If your code is too slow, consider trading some accuracy or precision for speed.
Deliverables
Helpful Starter Code
There is helpful starter code here. You can unzip that folder and open it in Arduino.
Questions
Please answer the following questions. Please cite any references, but acceptable answers should all be on this course website.
- Why is
#include<cmath>useful? - Describe in your own words what
virtualfunctions are. - Please compare the code in Lab2 and Lab1. What are the benefits by creating and using C++ classes in Lab2?
Summary of results
Please include a file with some temperature data that you collected. A text file of copy-pasted Serial Monitor output is fine.
Comparison
Please include a summary of whatever comparison that you made between the digital and analog temperature sensors.
Code
Please include your Arduino sketch files (i.e. .ino, .h, and .cpp files), and cite any code that is not yours.
Canvas Submission
Please submit everything as a .zip file on Canvas.