training-labs
Lab 4: Implementing Persistent Credential Storage
Objective:
The goal of this lab is to understand the SessionInfo and SessionState structures so that you can store LoRaWAN session information in persistent storage. Your LoRaWAN device will now be able to reset itself without having to join the LoRaWAN networks again. This will bring higher service quality to your fellow LoRaWAN neighbors. Devices in team projects should also implement this feature for efficient use of LoRaWAN resources.
By completing the fourth training lab, you will be able to:
- store LoRaWAN session information in persistent storage
- reduce the amount of join requests sent to the TTN Network Server
Table of Contents
-
Lab Background
-
Lab Preparation
-
Getting Started
-
Checking Your Work
-
Submit Your Work!
Lab Background
What is a FRAM? Why is it useful?
FRAM stands for Ferroelectric Random Access Memory. It is structured similarly to Dynamic RAM with one capacitor and one transitor per bit cell, but FRAM uses ferroelectric film capacitors which retain their stored value when power is lost, unlike other kinds of RAM which lose their value upon power loss. So, FRAM is non-volatile, while most RAM is volatile. FRAM also does not have nearly as limited of a write lifetime as flash memory (which the Feather boards have already on the microcontroller for use as infrequently-written non-volatile storage). Since LoRaWAN requires relatively frequent writing to non-volatile storage, FRAM is a good choice for a device to handle that storage. Incorporating good FRAM code into your project allows your device to lose power at any time and be able to resume communications over LoRaWAN without having to rejoin the network. The next section describes what LoRaWAN joining means. The Lab 3 device currently rejoins the network every time you reset it, which uses substantial downlink airtime. LoRaWAN gateways can only transmit to one device at a time, and most LoRa radios cannot transmit and receive simultaneously. So, it is imperative that you try your best to limit downlinks when possible.
How does LoRaWAN Joining Work?
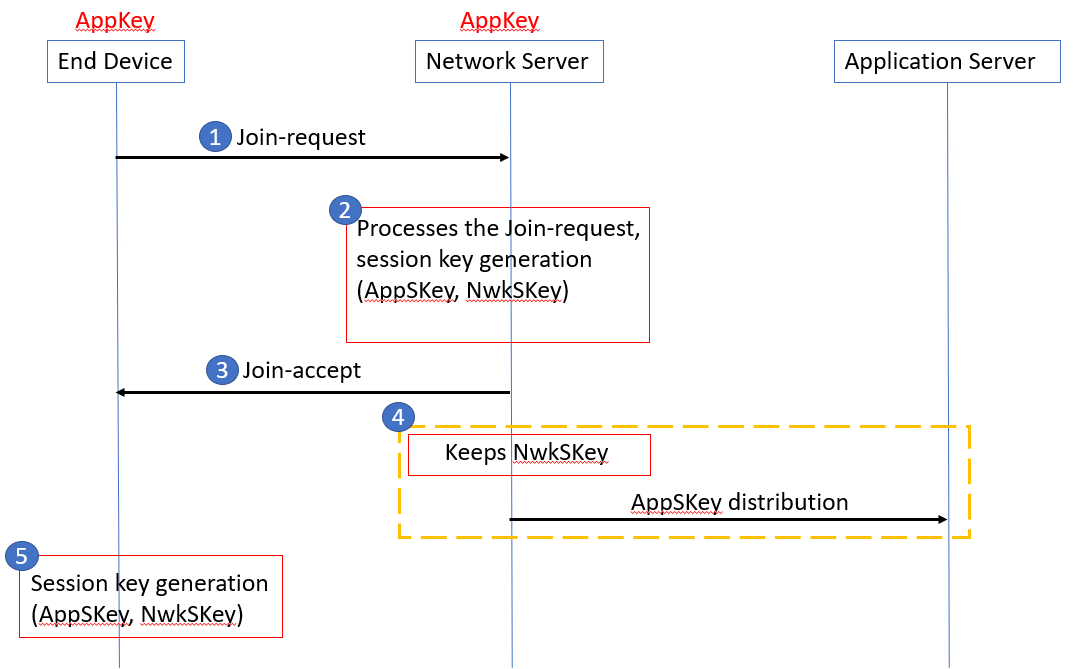
In Lab 3, your device transmitted to The Things Network by sending encrypted messages that were received by a gateway. The major step in the encryption setup is called “joining”, and your end device joins the TTN network using a process called OTAA, or Over The Air Activation.
The process is as follows:
-
Step 1: Your Feather device initiates the join process by transmitting an encrypted “join request” message containing its DevEUI (one of the identifiers in keys.h) and AppEUI(LoRaWAN 1.0)/JoinEUI(LoRaWAN 1.1) (also in keys.h) to a LoRaWAN Network Server – in this case TTN’s Network Server.
- App/JoinEUI – a 64-bit global application identifier in IEEE EUI64 address space that uniquely identifies the Join Server that can assist in the processing of the Join-request and derivation of the session keys.
- DevEUI – a 64-bit global device identifier in IEEE EUI64 address space that uniquely identifies the end-device.
That message is encrypted using the AppKey (the final identifier you provided in keys.h).
- AppKey - an AES-128 bit secret key known as the root key used to encrypt the end device’s join message. Note- This key is never sent across the network.
- Step 2: The Things Network processes our message and if valid, generates a set of different credentials. The credentials that are generated are called Activation by Personalization (ABP) credentials and include the following:
- Network Identifier (NetID. This has nothing to do with Cornell NetIDs.) The NetID is a 24-bit unique network identifier.
- Device Address (DevAddr) The DevAddr is a 32-bit device address assigned by the Network Server to the device after activation is complete to identify the end device within the current network.
- Network Session Key (NwkSKey) The network session key is used by the end device and Network Server to calculate and verify the Message Integrity Code (MIC) of all data messages for ensuring message integrity. The NwkSKey is also used to encrypt and decrypt payloads with MAC commands.
- Application Session Key (AppSKey) The application session key is used to encrypt and decrypt application payloads in data messages for ensuring message confidentiality.
- Step 3: The Things Network Server sends back the generated NetID, and DevAddr in an encrypted join-accept message as a downlink (a transmission of data from the internet to your device).
-
Step 4: The Network Server keeps the NwkSKey and distributes the AppSKey to the Application Server.
- Step 5: The device is now activated on the network! Your end device stores the DevAddr that it was assigned by the Network Server to identify it within the network. Before every uplink (sending data from your device to the internet), a LoRaWAN device signs and encrypts its data payload (the bytes you sent in Lab 3) with both the NwkSKey and AppSKey. The NetID and DevAddr are not encrypted however and help LoRaWAN gateways to route your packet to the correct network (The Things Network in our case)
Aside: Frame Counts
Frame counts (FCntUp and FCntDown) are also sent to guard against replay attacks. For example, if a device tries to send a message with FCntUp=5, but a message with FCntUp=10 was already received, the message with FCntUp=5 is ignored. Rejoining the network resets the frame counts to 0.
For further reading on the topic of OTAA in LoRaWAN, reference this article by The Things Network:
Lab Preparation
Download FRAM Libraries
In the Arduino IDE, select Tools->Manage Libraries, and please install the Catena Arduino Platform library if you have not done so already.
Rename MCCI_LoRaWAN_LMIC_library folder if you have not already done it
Find the directory location of the sketchbook libaries folder using instructions from Arduino.
A folder named MCCI_LoRaWAN_LMIC_library should be present. Please rename
that folder to arduino-lmic.
Attach the FRAM
The FRAM attaches to your board in the same way as your MCP9808 did in Lab 1. Connect the matching 3V/VDD, SDA, SCL, and GND pins between your Feather and the FRAM. Please read the pin labels carefully because the pin locations are different on the MCP9808 and the FRAM.
Compile and Upload the Test Code
Clone or copy the code from this repository.
https://github.coecis.cornell.edu/LPWAN-Training/fram_test
The sketch fram_test.ino should be in a folder named fram_test and have two .h files and two
.cpp files in the same folder for it to work.
The program tests part of the FRAM and then gives some sensor values. The code saves and loads a message from the FRAM upon reset and then simply blinks the LED. There are also two .cpp files and two .h files that you will use later.
Getting Started
The Task
The task is to devise some way for your Feather to detect whether it has valid
ABP credentials stored on the FRAM. If it does not, it will use
given OTAA credentials in order to generate them. (You have already
hard coded OTAA credentials in your keys.h file during your setup from Lab 3, though it may be preferable to save the OTAA
credentials on the FRAM as well). If there are no valid OTAA
credentials, the program is welcome to stall forever as it should
not try to guess credentials.
The recommended solution for the FRAM requires that you place the following library header at the top of your Lab 4 sketch:
#include "Catena_Fram32k.h"
That solution also requires that you copy the .h and .cpp files (Ece4950_Mcci_Fram.h,Ece4950_Mcci_Fram.cpp, Catena_Fram32k.h, Catena_Fram32k.cpp) from the fram_test folder that you downloaded earlier to your Lab 4 solution folder.
Now, make a copy of your working Lab 3 solution. For full lab completion, you will need to fill in definitions for the following 4 function bodies that were left unimplemented at the bottom of your Lab 3 sketch:
void cMyLoRaWAN::NetSaveSessionInfo() {}

void cMyLoRaWAN::NetSaveSessionState(const SessionState &State) {}

bool cMyLoRaWAN::NetGetSessionState(SessionState &State) {}

bool cMyLoRaWAN::GetAbpProvisioningInfo(Arduino_LoRaWAN::AbpProvisioningInfo* Info){}
Don’t worry if you’re unsure of how to implement all of these functions yet – we will walk through examples and give you building blocks to implement everything in the following sections!
The Data Structure
When your device joins the network with OTAA, it begins a session, and the Arduino-LoRaWAN library calls the following functions
virtual void NetSaveSessionInfo(
        const SessionInfo &Info,
        const uint8_t *pExtraInfo,
        size_t nExtraInfo) override;

virtual void NetSaveSessionState(const SessionState &State) override;
to save session information to non-volatile (aka permanent) storage. Your example sketch already has method stubs that have not been implemented yet. This is what those functions should currently look like in your sketch:
void
cMyLoRaWAN::NetSaveSessionInfo(
    const SessionInfo &Info,
    const uint8_t *pExtraInfo,
    size_t nExtraInfo
    ) {
    // save Info somewhere.
}

void
cMyLoRaWAN::NetSaveSessionState(const SessionState &State) {
    // save State somwwhere. Note that it's often the same;
    // often only the frame counters change.
}
Let’s begin by figuring out how we can implement these two methods. Looking at these functions’ parameters, we can see these methods pass references to the corresponding SessionInfo and SessionState data structures. These data structures contain all necessary information about the network session. You can check their definitions out for yourself by opening the ‘Arduino-LoRaWAN.h” file from the MCCI Arduino-LoRaWAN Library.
Otherwise, their declarations are reproduced below:
struct SessionInfoV2
                {
                // to ensure packing, we just repeat the header.
                uint8_t         Tag;            // kSessionInfoTag_V1
                uint8_t         Size;           // sizeof(SessionInfoV1)
                uint8_t         Rsv2;           // reserved
                uint8_t         Rsv3;           // reserved
                uint32_t        NetID;          // the network ID
                uint32_t        DevAddr;        // device address
                uint8_t         NwkSKey[16];    // network session key
                uint8_t         AppSKey[16];    // app session key
                };


        /// \brief information about the current session.
        ///
        /// \details
        /// This structure is stored persistently if
        /// possible, and represents the result of a join. We allow for
        /// versioning, primarily so that (if we
        /// choose) we can accommodate older versions and very simple
        /// storage schemes.
        ///
        /// Older versions of Arduino_LoRaWAN sent version 1 at join,
        /// including the frame counts. Newer versions send version 2
        /// at join, followed by a SessionState message (which includes
        /// the frame counts).
        ///
        /// \see SessionState
        ///
        typedef union SessionInfo_u
                {
                /// the header, same for all versions
                SessionInfoHeader       Header;

                /// the V1 form used through v0.8 of the Arduino_LoraWAN.
                SessionInfoV1   V1;

                /// SessionInfo::V2 is used as v0.9 of the Arduino_LoRaWAN,
                /// in conjunction with the SessionState message
                SessionInfoV2   V2;
                } SessionInfo;

///
        /// \brief the first version of SessionState
        ///
        struct SessionStateV1
                {
                // to ensure packing, we just repeat the header.
                SessionStateTag Tag;            ///< kSessionStateTag_V1
                uint8_t         Size;           ///< sizeof(SessionStateV1)
                uint8_t         Region;         ///< selected region.
                uint8_t         LinkDR;         ///< Current link DR (per [1.0.2] 5.2)
                // above 4 entries make one uint32_t.

                // keep uint32_t values together for alignment
                uint32_t        FCntUp;         ///< uplink frame count
                uint32_t        FCntDown;       ///< downlink frame count
                uint32_t        gpsTime;        ///< if non-zero, "as-of" time.
                uint32_t        globalAvail;    ///< osticks to global avail time.
                uint32_t        Rx2Frequency;   ///< RX2 Frequency (in Hz)
                uint32_t        PingFrequency;  ///< class B: ping frequency

                // next, the uint16_t values, again for alignment
                uint16_t        Country;        ///< Country code
                int16_t         LinkIntegrity;  ///< the link-integrity counter.

                // finally, the uint8_t values
                uint8_t         TxPower;        ///< Current TX power (per LinkADR)
                uint8_t         Redundancy;     ///< NbTrans (in bits 3:0)
                uint8_t         DutyCycle;      ///< Duty cycle (per [1.0.2] 5.3)
                uint8_t         Rx1DRoffset;    ///< RX1 datarate offset

                uint8_t         Rx2DataRate;    ///< RX2 data rate
                uint8_t         RxDelay;        ///< RX window delay
                uint8_t         TxParam;        ///< saved TX param
                uint8_t         BeaconChannel;  ///< class B: beacon channel.

                uint8_t         PingDr;         ///< class B: ping datarate
                uint8_t         MacRxParamAns;  ///< saved LMIC.dn2Ans
                uint8_t         MacDlChannelAns;///< saved LMIC.macDlChannelAns
                uint8_t         MacRxTimingSetupAns;    ///< saved LMIC.macRxTimingSetupAns;

                // at the very end
                SessionChannelMask Channels;    ///< info about the enabled channels
                };

        static_assert(sizeof(SessionStateV1) < 256, "SessionStateV1 is too large");

        typedef union SessionState_u
                {
                SessionStateHeader      Header;
                SessionStateV1          V1;
                bool isValid() const;
                } SessionState;
Aside: SessionInfo
uniontypeC++ unions allow you to take advantage of the C++ type system to have something like an “int-or-char” data type, if you set it up correctly. As far as we’re concerned, we’ll just use the V2 SessionInfo struct, accessed as
mySessionInfo.V2ormySessionInfo->V2assuming that the SessionInfo struct that you want to access is calledmySessionInfo. We will use the V1 SessionState struct as well.
First, look at SessionInfoV2. Does it have any pieces of ABP data?
If so, which pieces does it have?
Answer: What ABP Data does SessionInfoV2 have?
NetID, DevAddr, NwkSKey, and AppSKey.Next, look at SessionStateV1. Does it have any data that was mentioned
previously in the Lab Background?
Answer: Any familiar data in SessionStateV1?
FCntUp and FCntDown look familiar.It seems like these two structures each contain ABP data that we receive from TTN in the joining process, and it would be a good idea to be able to write data from the SessionInfo and SessionState data structures to the FRAM. Let’s study how to do that next.
What bytes are in a SessionInfo structure?
The following stub loops through every byte in a SessionInfo
called Info and prints every byte to the serial console.
This step is really helpful in allowing us to see what the SessionInfo struct actually contains!
It then just prints the NwkSKey.
Aside: The NwkSKey should match what the TTN console shows on your device’s overview page.
// Hint: you can place this stub into the NetSaveSessionInfo function
// and it will work.
// You may ignore the other arguments
// of the NetSaveSessionInfo.
// The current Arduino_LoRaWAN library does not appear to use
// them.
int i;
uint8_t * infoBytes;


Serial.println("Print all SessionInfo bytes to the console");
// Have to explicitly cast as (uint8_t *). Compiler throws an error if the
// line is infoBytes = &Info;
infoBytes = (uint8_t *) &Info;
for (i=0; i<sizeof(SessionInfo); i++){
    Serial.print(infoBytes[i], HEX);
}

Serial.println();
Serial.println("Print just the NwkSKey");
#define SKEY_SIZE 16
infoBytes = (uint8_t *) &(Info.V2.NwkSKey);
for (i=0; i < SKEY_SIZE; i++){
    Serial.print(infoBytes[i], HEX);
}
Serial.println();
Information on the data types used is found in Arduino_LoRaWAN.h,
and is reproduced here.
// the provisioning blob.
struct ProvisioningInfo
        {
        ProvisioningStyle       Style;
        AbpProvisioningInfo     AbpInfo;
        OtaaProvisioningInfo    OtaaInfo;
        };
// the provisioning styles.
enum class ProvisioningStyle
        {
        kNone, kABP, kOTAA
        };

// information provided for ABP provisioning
struct AbpProvisioningInfo
        {
        uint8_t         NwkSKey[16];
        uint8_t         AppSKey[16];
        uint32_t        DevAddr;
        uint32_t        NetID;
        uint32_t        FCntUp;
        uint32_t        FCntDown;
        };

// information provided for OTAA provisioning
struct OtaaProvisioningInfo
        {
        uint8_t         AppKey[16];
        uint8_t         DevEUI[8];
        uint8_t         AppEUI[8];
        };
Can you identify where the six pieces of data in struct AbpProvisioningInfo are
in the structures SessionStateV1 and SessionInfoV2?
Writing LoRaWAN Session Data to the FRAM
Okay, now that we have the necessary understanding of the data structures and the pieces of data we are targeting, let’s start writing some code! It is always a good idea to avoid reinventing the wheel if a good solution already exists. In this case, the MCCI Catena library has a few useful functions that do the heavy lifting of FRAM management.
First, lets add an object which we will call theFram, of type cFram32k from the MCCICatena library to our class definition for cMyLoRaWan by adding the
following lines to the top of your cMyLoRaWan definition.
//Add the following to your cMyLoRaWan definition:
using Super = Arduino_LoRaWAN_ttn;
McciCatena::cFram32k theFram;
public: //already present
  bool begin(const Arduino_LoRaWAN::lmic_pinmap& map);
The line
using Super = Arduino_LoRaWAN_ttn;
is known as a type alias in C++. Essentially, it allows us to reference the ‘Arduino_LoRaWAN_ttn’ library within later code in the cMyLoRaWan class as ‘Super’ instead of typing out ‘Arduino_LoRaWAN_ttn’ every time. This improves readability, but is also just an aesthetic choice. Try leaving it out of your code, follow the following steps, and see what happens when you compile!
Now, in order to initialize our FRAM, we need to call the FRAM’s begin() function somewhere. Instead of cluttering
up our setup() function with a series of calls and checks to begin our FRAM, let’s have our cMyLoRaWan class define a function that begins the FRAM so we can just call that in our setup() insead. We still want to use the begin() function of the
superclass since it starts the LoRa radio. This is where our call to Super comes in!
bool cMyLoRaWAN::begin(const Arduino_LoRaWAN::lmic_pinmap&  map){
     if(!theFram.begin()){
        Serial.println("Fram begin fail");
      }
      if(
      !theFram.initialize()){
        Serial.println("Fram not valid");
      }
      if (!Super::begin(map))
        return false;
      return true;
                }
The Catena_Fram32k that we added can save and load data to it by using the following
functions saveField and getField respectively:
//Not the actual class: this is simplified representation to illustrate how to
//call saveField and getField
class Catena_Fram32k{
  //Other parts of the class...
        void saveField(cFramStorage::StandardKeys uKey,const keyDataType &field);
        bool getField(cFramStorage::StandardKeys uKey,keyDataType &field);
//Other parts of the class...
};
But what are these StandardKeys mentioned in the above snippet? Standard keys are reproduced below:
//From class McciCatena::cFramStorage
//Copyright notice:
//        See accompanying LICENSE file (Catena Arduino Platform)
enum McciCatena::cFramStorage::StandardKeys : uint8_t
                {
                kHeader = 0,
                kSysEUI = 1,
                kPlatformGuid = 2,
                kDevEUI = 3,
                kAppEUI = 4,
                kDevAddr = 5,
                kJoin = 6,
                kLoRaClass = 7,
                kNwkSKey = 8,
                kAppSKey = 9,
                kFCntDown = 10,
                kFCntUp = 11,
                kNetID = 12,
                kAppKey = 13,
                kBootCount = 14,
                kOperatingFlags = 15,
                kBme680Cal = 16,
                kAppConf = 17,
                kLmicSessionState = 18,
                // when you add something, also update McciCatena::cFramStorage::vItemDefs[]!
                kMAX
                };
The precondition for the saveField and getField functions is that you pass the correct datatype for the key that you
want to save. For example, if you wanted to store a DevAddr, you would see
that kDevAddr is a standard key and pass that standard key using
C++ namespace syntax as McciCatena::cFramStorage::kDevAddr.
If you pass a key and matching data value to the saveField or getField functions,
the FRAM library will attempt to save your field
to the FRAM or get the field from the FRAM and update the field that you passed.
getField returns true if it successfully read the field from the FRAM
and false if it fails for any reason.
Notice that for the SessionInfo structure passed in NetSaveSessionInfo,
the non-constant values (NetID, DevAddr, NwkSKey, AppSKey) are standard keys!
Therefore to save the DevAddr to the FRAM, you can do the following:
void cMyLoRaWAN::NetSaveSessionInfo(/*parameters...*/) {
    //The important values are standard keys!
    //tag, size, rsv2, and rsv3 don't need saving.
    theFram.saveField(McciCatena::cFramStorage::kDevAddr, Info.V2.DevAddr);
    //Do the rest here!
}
Now your turn: how would we save the remaining ABP data (NetID,NwkSKey, and AppSKey) from the SessionInfo structure to the FRAM? Implement the code, and check with our TA staff once you’re done to see if you’re on the right track!
Next let’s try implementing NetSaveSessionState. This is even easier: MCCI made it a one-liner!
void
cMyLoRaWAN::NetSaveSessionState(SessionState &State) {
    //Fill in the function definition! (Hint: this should be very similar to your implementation for NetSaveSessionInfo!)
}
Finally, implement NetGetSessionState. (Note the return type of the function!)
bool
cMyLoRaWAN::NetGetSessionState(SessionState &State) {
    //Fill in the function definition! (Hint: this should be very similar to your implementation for NetSaveSessionState, but this time we need to retrieve session state!)
}
Alright now that these 3 functions are complete, we are almost done with Lab 4! We just need to finish GetAbpProvisioningInfo.
For GetAbpProvisioningInfo, you need to inspect
struct AbpProvisioningInfo (shown earlier), to see which keys
you need to load from the FRAM. However, before copying anything into Info,
we need to check to make sure that it is pointing to an actual address in memory.
We can do that with the below snippet:
if (!Info) return false;//Library calls with null pointer sometimes
After this null pointer check, we will probably have to copy some values
from the saved SessionState. Can you recall which two values we will we need to
to copy from the saved SessionState? If you’re unsure about which values to save, revisit the SessionStateV1 object in the Data Structure section. There are 2 important values in that SessionState object that ensure the integrity and freshness of data.
You can make a temporary SessionState variable and use getField to fill it
from the FRAM. You will then copy important values from temporaryState to
Info. An example is below.
bool
cMyLoRaWAN::GetAbpProvisioningInfo(Arduino_LoRaWAN::AbpProvisioningInfo* Info){
   SessionState temporaryState;
   if (!theFram.getField(McciCatena::cFramStorage::kLmicSessionState, temporaryState)) return false;
   //Use the temporary SessionState to get important values from it.

   Info->youPickTheMemberToFill = temporaryState.valueYouNeedToCopy;
}
Finally, in this function, remember to return false
if any value is missing for any reason, and to return true if all values
are present in Info. Secondly, Info is a different datatype. It
is a pointer to an AbpProvisioningInfo struct, not a SessionInfo
union/struct. Lastly, remember that since Info is a pointer,
so you need to use -> instead of . to access its members. Ex:
if (!theFram.getField(McciCatena::cFramStorage::kNwkSKey, Info->NwkSKey)) return false;
Note also that NwkSKey is an array, and we simply give that to the FRAM
function: no need to index like NwkSKey[0].
Checking your Work
Sending a counter without rejoining
Your device should now be able to be reset without needing another LoRaWAN join operation. To test this, you can write a function that increments a counter with each transmission as part of your packet. When the Feather reboots, it should reset your counter to its initial value, allowing you to visually see in the TTN console when your Feather has rebooted.
Monitoring the TTN console, let the value of the counter increment with each transmission for a couple seconds. Now, reset the Feather (either using the Feather’s onboard reset button or by unplugging and re-plugging it). The counter should reset to its initial value indicating that the Feather was successfully rebooted. Additionally, there should be no new join operation logged in the console when this occurs – indicating you completed the objective of the lab successfully! If you still see a join operation created in the console between resets, you might have made an error in one of your function implementations. Double check your work, and if you’re still stuck, reach out to our TA staff.
Submit your Work
Lab 4 Deliverable
For your lab 4 checkout, you should submit the following to Canvas:
- a screenshot of a decoded counter that demonstrates the device being reset without needing to rejoin the network. For example, you could send a string “boot” in your packet and then change it to “shoe” after sending the first packet after restarting. You might choose instead to send a counter that resets itself.
- any code (C++, C, Python) that you wrote
- citations for any materials that are not yours