ECE 3400 Team 1 Milestone 2
Goal/Objectives
The goal of this milestone was to combine the wall following from milestone one with wall detection. There were two main components of this objective. First: implementing wall detection and right-hand wall following. Second: combining wall detection and right-hand wall following with the line following from the first milestone.
We split up the goals into 4 main sub-tasks:
- Designing the IR wall sensor circuit
- Adding additional components to our robot, for example, a way to mount the wall sensors to our robot
- Implementing the wall-following logic
- Integrating the wall-following logic with the line-following logic from the previous milestone
Designing the IR wall sensor circuit
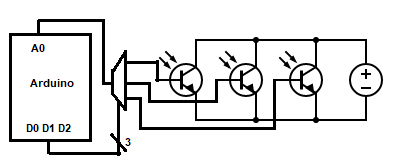
To implement wall detection, we are using short-range IR phototransistors. The IR light sensor circuit is fairly simple. Each light sensor has Vdd and ground pins that go to the respective terminal of the arduino, and the sensor outputs go to ports on the mux. However, we discovered that the mux circuit has some non-ideal behaviors that we do not understand well yet, and so we are temporarily using the leftover analog pins on the arduino. The original design was to have a right, forward, and left wall sensor. However, due to a limiting number of analog pins we are only using the right and forward sensors.
Here is a basic diagram of our ideal wall sensor circuit:
Additional components:
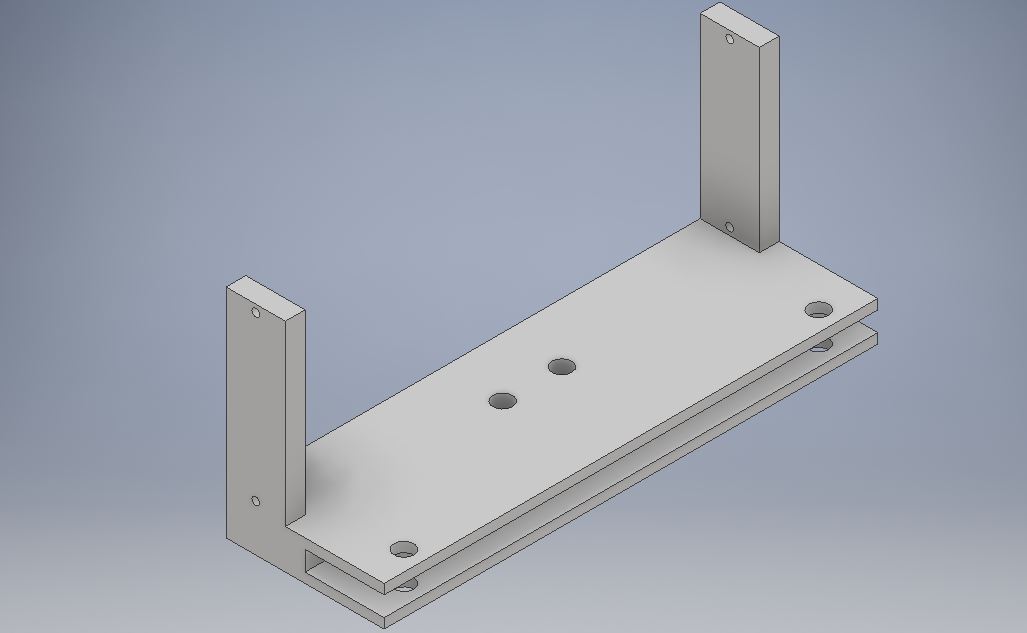
There were two major issues that needed to be addressed with the structure of the robot. First, the large size of the wheels used made it difficult to mount the wall sensors. Second, the robot was prone to tipping backwards which made the line sensors not able to accurately distinguish between light and dark. In order to solve both of these issues at once, we developed a back piece with vertical prongs that allowed the sensor to be mounted on the side, and with holes that allowed a caster ball to be attached underneath and support the back of the robot. Though there were some tolerancing errors that made the piece difficult to install and made the main wheels lose some traction, after some adjustments the piece functions properly.
Wall Following Logic:
After having working sensors mounted to our robot, the next step was to think through right-hand wall following. Joseph designed the following code:
if (!(right)) {

      turn_right();

      return;

  }

  if (!(front)) {

      go_straight();

      return;

  }

  if (!(left)) {

      turn_left();

      return;

  }

  turn_around();
This code outlines the rather simple logic of a right-hand wall-follower. The right, front, and left variables each state whether the right, front, and left sensors see a wall. Since we want the robot to follow right walls, if the robot does not see anything to its left, then it should turn right. If there is a wall to its right but not in front of it, then it should move forward. If the robot can’t move right or move forward then it should turn left. If the robot can’t move at all given these possible directions then it is at a dead end and should turn around.
After removing the left sensor, the code was changed to the following:
if (!(right)) {

      turn_right();

      return;

  }

  if (!(front)) {

      go_straight();

      return;

  }

  rotate_left();

  navigate();
Now if there is not a wall to the right or to the front of the robot, it will always rotate in place. The navigate() function is actually a recursive call to itself, so it will check again with its new position where it should turn.
Line-sensor wall-sensor integration:
The final piece to the puzzle for this assignment was combining the milestone 1 code with our new wall-following logic. Joseph solved this problem by changing the line-follower code to run until it found a junction, and then exit and free the processor. This means that whenever the robot sees a junction, it exits the line-follower code and then it then positions itself in the middle of the junction using a subroutine, checks the walls and runs the wall-follower logic, turns according to the wall-follower logic and then finds the next junction by running the line-follower. At the top-level, the main (loop) function is very simple: this is actual code that is run!
void loop() {

  while (1) {

      line_follow();

      navigate();

    }

}
So by using the line follower as a tool to get from junction to junction, and using the wall follower (navigate) to figure out which the next junction is to get to, both implementations can work together and are still decoupled and modular enough to be worked on individually.
Footage Compilation
The following video shows the robot navigating around a maze, finding itself in a variety of different surroundings and acting appropriately. The robot would sometimes get stuck and so we would have to help it a little, but the video should show plenty of instances where the robot is able to make decisions and find its way autonomously.
Code - GitHub
Specifically, look at milestone2_wall_line.ino under lab2_sketches.