info2300-2020sp-website
Lab Homework 0: Submitting Assignments
In this lab, we will walk you through how to install all the software required for this course as well as gain practice on how to submit an assignment using Git and GitHub.
Learning Objectives
- Become familiar with web development tools like Visual Studio Code.
- Exposure to the basics of developing a PHP based website locally.
- Learn how to submit assignments in this course.
- Understand the course procedures and policies.
Deadline
| Lab Homework | Deadline | Slip Days | Credit |
|---|---|---|---|
| Part I | Thu 1/23 at 11:59pm | Not permitted | 2 points |
| Parts II & III | Sun 1/26 at 11:59pm | Not permitted | 8 points |
Instructions
-
Start early.
If you get stuck, you may need help. The sooner the better. Don’t wait until right before the deadline.
-
If you get stuck, go back and verify that you completed the instructions exactly before asking for help.
Learn how to carefully follow instructions. Learn how to solve your own problems.
If you tried to re-check the instructions and you’re still stuck, seek assistance. We are here to help!
-
If you need help, please visit office hours.
Due to the wide variability of the issues you may encounter, we will rarely be able to determine and resolve your issue on Campuswire or over email.
Please do visit office hours. They are the best way to help you!
-
What you need to complete this lab.
If you plan on using your personal laptop to work on your assignments this semester, follow these instructions on your laptop.
Otherwise you need to follow these instructions in a computer lab in the Engineering School. If you plan to use the lab computers, please bring a USB drive that you can use to save your work.
-
Submit.
When you’re finished, follow the instructions in submit.md to submit your assignment.
Part I: Request Git Repository
IMPORTANT! You must complete Part I and wait for your Git repository to be created before you can complete Part III.
Please be patient while we create your Git repository. We have to manually add you to our GitHub organization and this takes time for 300+ students. We will process requests once per day during regular business hours (Monday-Friday, 8am-5pm).
Requesting your Git Repository
You’ll need a Git repository to submit this assignment. We need to do this for you, but in order for us to create your repository, we need some information from you.
-
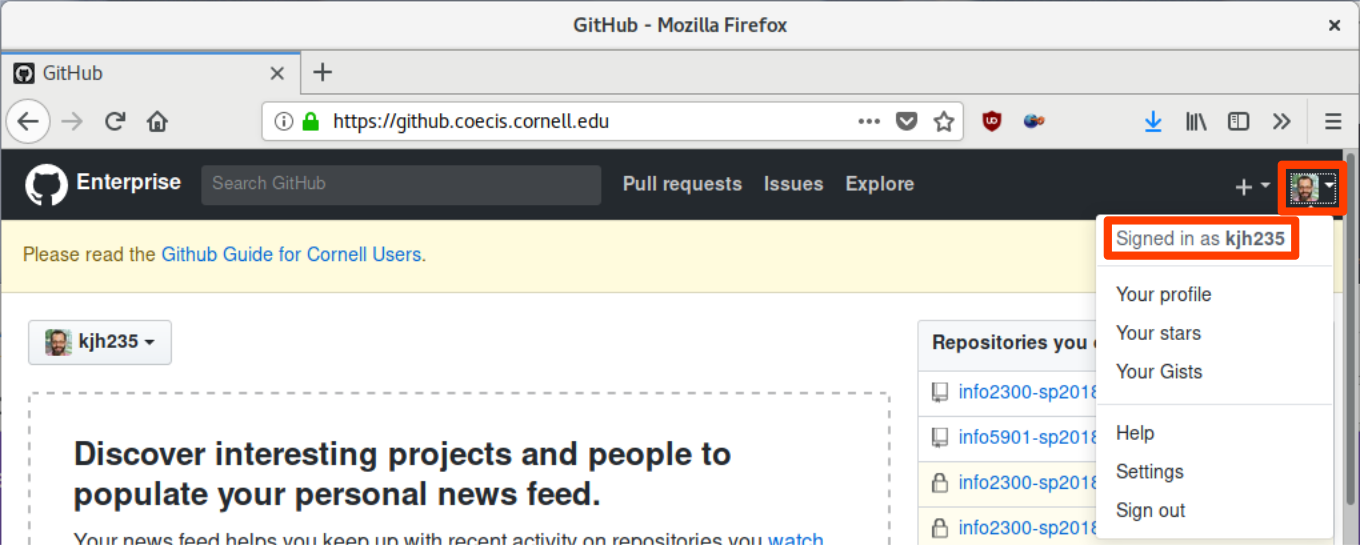
Go to https://github.coecis.cornell.edu/ and log in using your Cornell credentials (your NetID as the username and your password).
Do not use your Cornell email address for the username; use your NetID only.
-
Make a note of your Cornell GitHub username. You’ll need it for the next step.
Click the avatar in the top-right corner. You should see Signed in as USERNAME.
-
Fill out this survey: https://forms.gle/3seCUTfYv88DsPax8
Join the Discussion Forum
The course discussion forum is hosted on Campuswire. This is a public forum for you to ask and answer questions that are of interest to everyone in the class.
Always post publicly. Never use private posts. Never ask personal questions on Campuswire (questions that are not of interests to everyone in the class). Personal matters should be sent to info2300-prof@cornell.edu.
-
Visit https://campuswire.com/p/GA7FCC42C and follow the instructions to join our class discussion.
-
Reminder: This public forum to ask and answer questions that are relevant to the entire class.
Do not post personal matters to Campuswire. Keep your private information, private!
Examples of things you should not post to Campuswire:
- Your code isn’t working. Visit office hours.
- You are having trouble cloning your Git repository. Visit office hours.
- You are having trouble submitting your assignment. Visit office hours.
- You are unhappy with your grade. Submit a regrade request.
- You want to shame the instructor because you don’t like his policies. Visit the instructor’s office hours.
Part II: Installing the Course Software
In Part II, you’ll install the official course software you’ll need to use for assignments (lab homework and projects) in this course.
Note: All of the software that is listed in this document is supported by all of the teaching staff. You are free to use any other tools that you like, however if you have an issue, we will only help you with the officially support course tools. Please note that Sublime and Safari are not supported.
Install or Update Firefox and Chrome
Google Chrome and Mozilla Firefox are two of the most popular browsers used today on the web. For example, look at W3Schools Statistics, together, 90% of their visitors utilize Chrome and Firefox. Since they currently dominate the browser usage share, it is important that we test our projects and designs on these two browsers throughout the semester.
Mozilla’s Firefox is the official browser for this course; however, grading will be done in either or both Firefox and Chrome. Your web pages will need to work in both.
Please go through the steps to install and update (if already installed) for both browsers on your system.
Firefox
Firefox is the official browser for this course.
Firefox is an open-source web browser that is created by the not-for-profit Mozilla foundation. Firefox takes privacy and the security of your data extremely seriously: https://www.mozilla.org/en-US/privacy/** The Mozilla Foundation does not profit off your data.
If you already have Firefox installed, update to the latest version. Otherwise download and install Firefox.
Update Firefox
-
Go to Menu (the hamburger button/triple bar ☰) on the top right corner.
-
Click “Help” and then “About Firefox.”
-
If Firefox is out of date, it will start downloading the latest update. Please press the restart button when prompted.
Install Firefox
Download and install Firefox from here: https://www.mozilla.org/en-US/firefox/
Chrome/Chromium
Chrome is a proprietary web browser created by Google. Google profits off the information it learns about you when using its browser. It shares this information with third parties, including governments, without notice nor transparency. I would strongly encourage you to use a browser that protects your privacy. Google Chrome does not.
You may install Google Chrome or the open source version, Chromium.
If you already have Chrome/Chromium installed, update to the latest version. Otherwise download and install Chrome/Chromium.
Update Chrome
-
Go to Menu (the vertical ellipsis ⋮) on the top right corner.
-
Click “Help” and then “About Google Chrome.”
-
Google Chrome will automatically start updating to the newest version.
Install Chrome
Download and install Chrome from here: https://www.google.com/chrome/
Install or Update Git
Git is a free and open source distributed version control system. In industry, it is the main tool for collaborative work among developers. To help you develop experience using version control, we will use Git to distribute and submit assignments throughout the semester.
-
To install or update Git, please download the install package at the following link: https://git-scm.com/download/.
-
Download Git for your computer.
If you’re using the lab computers with a thumb drive you may want to download “64-bit Git for Windows Portable”
-
Once downloaded, launch the installer and follow the on-screen instructions to install Git. We will be using the default settings; just continuously click next until you reach Finish.
Note: Mac users: If you get an “can’t be opened because it is from an unidentified developer” or “unable to mount” error, open your System Preferences. Select the Security & Privacy panel and press Open Anyway.
Adding a new SSH Key to your Cornell GitHub
CAREFULLY FOLLOW THESE DIRECTIONS. This is the section that gives students the most trouble because they do not follow the directions carefully. If you need help, visit office hours. Resolving SSH key issues on Campuswire is too difficult and we will refer you to office hours.
Course documents and assignments will be distributed and submitted through the Cornell GitHub. Adding an SSH Key to your GitHub is useful as it will authenticate your computer so that you no longer have to type your password each and every time you interact with the repository.
-
Go to https://github.coecis.cornell.edu/ and log in using your Cornell credentials.
Use your NetID as the username; do not use your Cornell email.
-
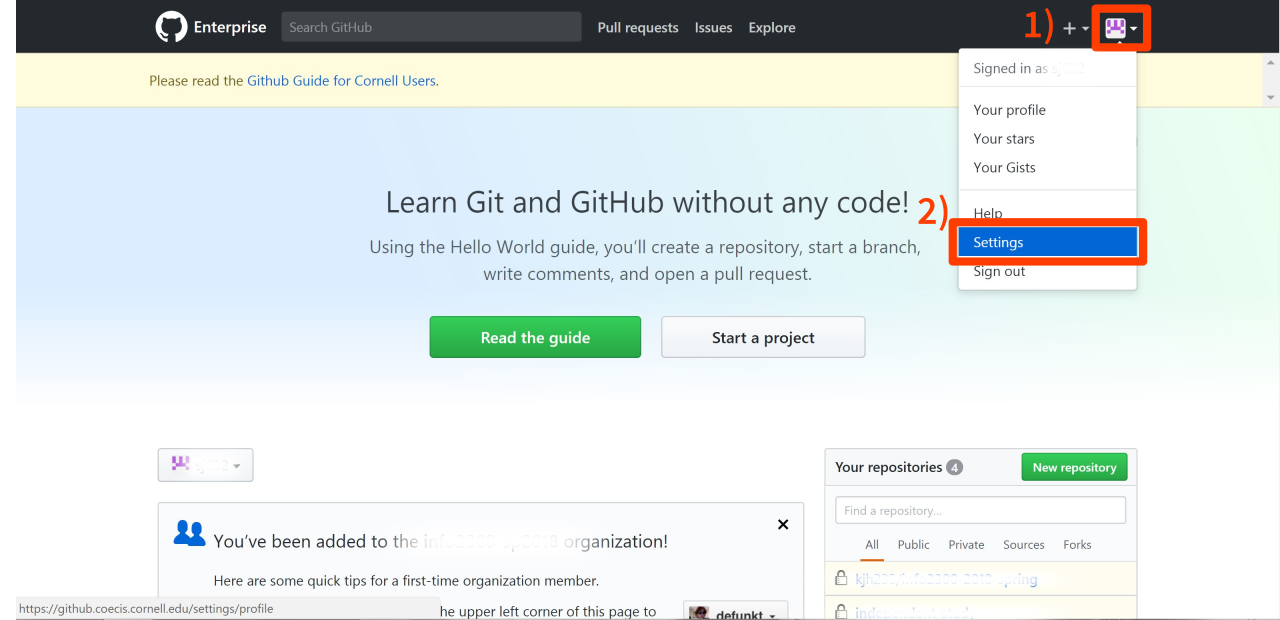
Go to the upper right corner of the screen to click your avatar. From the drop down, select “Settings”.
-
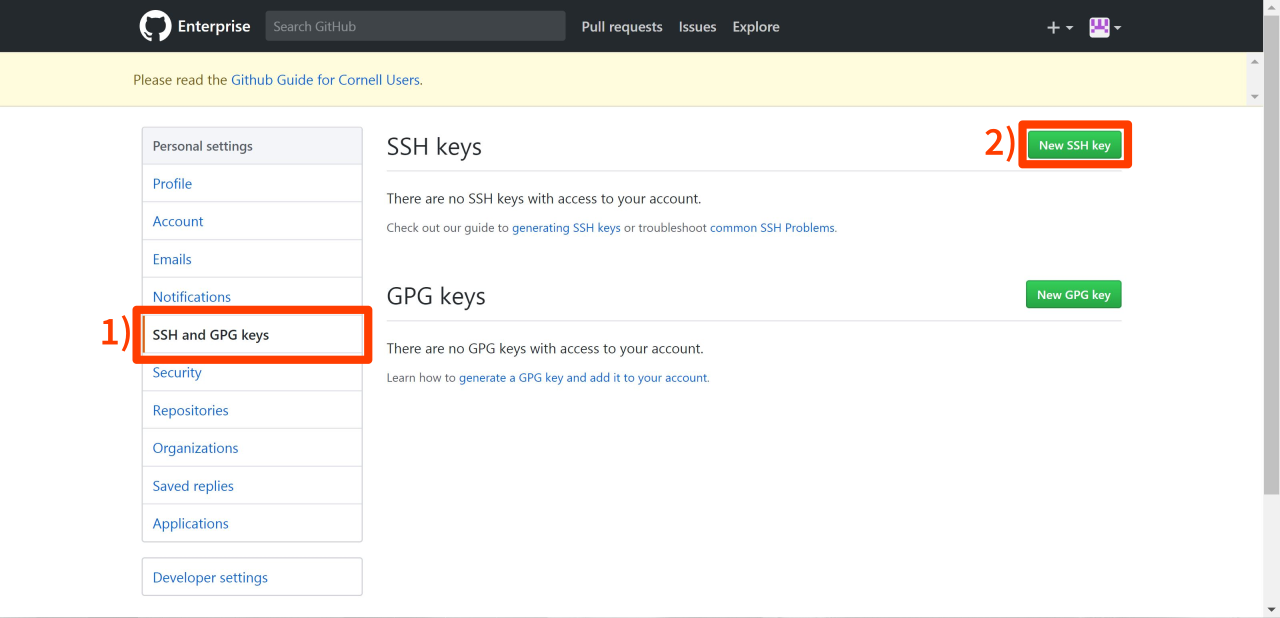
On the left-hand panel, under “Personal settings”, click “SSH and GPG keys” and then click “New SSH key” in the upper right corner.
-
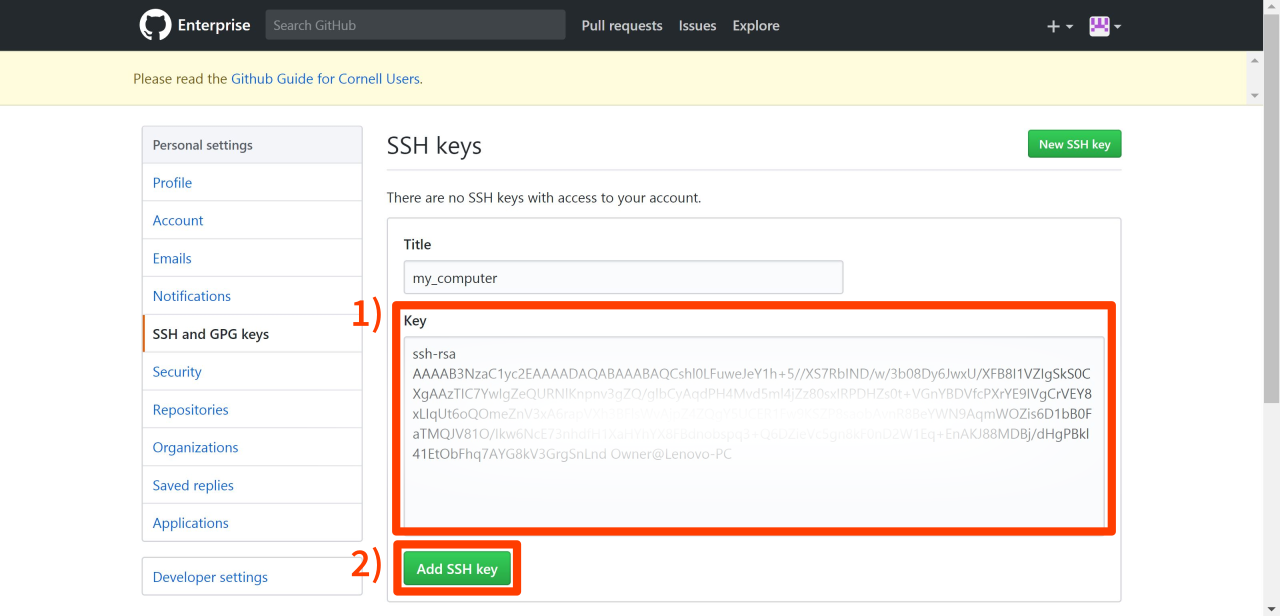
Create whatever name you want to identify your repository such as “My Laptop.”

-
Minimize your web browser. Do not close the GitHub SSH key page.
- Open your command line app.
- Windows: open Git Bash (Do NOT use “Command Prompt”).
- Mac: open Terminal.
-
Generate a new SSH key. This key will authenticate your computer with Cornell’s GitHub server.
IMPORTANT! This step causes students the most trouble. Follow the instructions exactly.\ DO NOT ENTER A PASSWORD!
Enter the following in your command line app:
ssh-keygen -t rsa -b 4096 -C "YOUR_NETID@cornell.edu". Replace YOUR_NETID with your NetID.- Press enter when asked: “Enter file in which to save the key.
- If asked “[…]/.ssh/id_rsa already exists. Overwrite (y/n)?” type y and press enter.
-
When asked: “Enter passphrase (empty for no passphrase):” just press enter.
DO NOT ENTER A PASSWORD! ONLY PRESS ENTER!
- When asked: “Enter same passphrase again:” just press enter.
- You should now see confirmation that your key has been successfully created.
- Now we need to copy your SSH Key to the clipboard. Type the follow command into the command line:
- Windows:
cat ~/.ssh/id_rsa.pub | clip - Mac:
pbcopy < ~/.ssh/id_rsa.pub
The above command will copy your SSH Key to your clipboard.
- Windows:
-
Go pull up the browser again and paste into the “Key” box and then click “Add SSH key”.
-
Now test that your connection to Cornell’s GitHub works. Enter the following command into your command line:
ssh -T git@github.coecis.cornell.eduIf prompted “Are you sure you want to continue connecting (yes/no)?”, type yes and press enter.
If you are prompted for a password, you didn’t follow the instructions above carefully. Go back to start and retry following the instructions from step 1.
You should see a message stating You’ve successfully authenticated…
If you fail to successfully authenticate, stop and review all the directions in this section. Check that you have carefully followed them. Did you miss a step? Did you not read carefully? Complete these instructions again. If that doesn’t work, visit office hours. Do not post SSH issues to Campuswire or email the instructor.
Install GitHub Desktop
We will be using GitHub Desktop to make interacting with git easier. Please go through the following steps to install GitHub Desktop and log in to the proper account.
-
Go to https://desktop.github.com/ and click the large purple button to download (it should detect your operating system automatically).
-
Once the application has finished downloading,
- Windows: Double click GitHubDesktopSetup.exe. Be patient; if you start running the installer a second time while the first installer is still running, installation will fail and you will get an error message. The application will open automatically.
- Mac: unzip “GitHubDesktop.zip” and then drag GitHub Desktop to the applications folder. Then open the application.
-
Once the application is open, select “Sign into GitHub Enterprise”.
-
In the “Enterprise server address” box, type
https://github.coecis.cornell.edu/and then click “Continue.” -
Enter your Cornell GitHub username (this should be your NetID) and password, then click “Sign In.”
-
The next page will specify the name and email you will use for your Git commits.
For name, use the name you would like the course staff to use to refer to you; “Kyle Harms” is good, “BabyCorn1983” is bad.
For email, use your Cornell email: [netid]@cornell.edu, where you replace [netid] with you netid. Then click “Continue.”
Note: The name you specify here is the name that will be “tagged” to all of your assignment submissions. You must use your proper name. Otherwise, your assignment submissions will appear that someone else submitted them. This is likely to trigger an academic misconduct investigation.
-
Choose whether you want GitHub Desktop to keep track of anonymous usage data by leaving the box checked (to allow anonymous usage statistics) or unchecking it (if you do not want anonymous usage statistics collected). Then click “Finish.”
-
GitHub Desktop should now display a page that says “No repositories found.” This means you’re done with the installation process. Just close GitHub Desktop and move on to the next step.
-
You will probably get an email from GitHub with a subject line “[GitHub] A third-party OAuth application has been added to your account”. This is your GitHub Desktop login, so you don’t need to worry somebody else is trying to hack your account.
Install PHP 7.0 or higher
PHP enables us to create dynamically generated web pages. PHP stands for PHP: Hypertext Preprocessor.
How you install PHP depends on your operating system. Read the section for your system and follow the instructions.
Windows
-
Go to Microsoft’s Web Platform Installer page (https://www.microsoft.com/web/downloads/platform.aspx).
-
Click the green “Install this extension” button on the right.
-
Once the program has finished downloading, launch it.
-
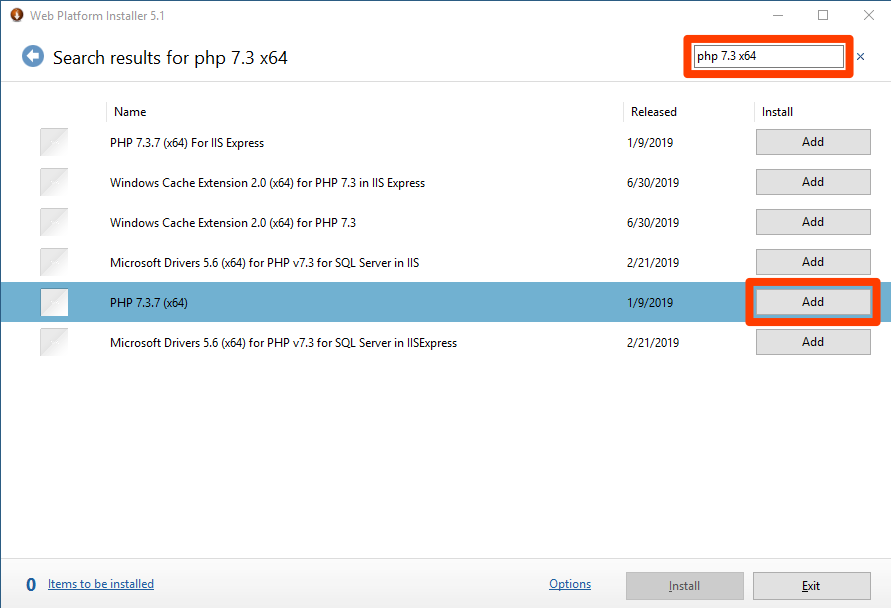
In the top right, search for “php 7.3 x64”:
-
Click the “Add” button next to PHP 7.3 (x64).
-
Scroll to the bottom and click “Install.”
-
Click “I accept” and wait for installation to complete.
-
Some platforms (as pictured below) may fail to install; this is okay, as long as PHP 7.X (x64) is installed successfully.

Mac
Older macs come installed with PHP 5 pre-installed. Newer macs come with PHP 7.0 or greater installed.
-
Open Terminal (Applications/Utilities/Terminal).
-
Enter the following command and press enter:
php --versionIf you it reports PHP 7.0 or higher, stop! You don’t need to install anything.
If it reports PHP 5 or anything less than PHP 7.0, follow the next step.
-
Copy and paste
curl -s https://php-osx.liip.ch/install.sh | bash -s force 7.3into the command line and press “enter” or “return”. -
Copy and paste
sudo rm /usr/local/php5/php.d/99-liip-developer.iniinto the command line and press “enter” or “return”.Note: If you get an error like “no such file or directory”, that’s okay. Move on to the next section.
Linux
Install the the php-pdo package.
Install or Update Visual Studio Code
We will use Visual Studio Code, often shortened to Code or VS Code, as the official code editor for INFO 2300.
In this section, you’ll update Visual Studio Code if you have it already installed, or you’ll install it.
Update Visual Studio Code
If you already have Code installed, you should update it to the latest version. See https://vscode-docs.readthedocs.io/en/stable/supporting/howtoupdate/ for directions.
Install Visual Studio Code.
-
Download the installer for for Code from https://code.visualstudio.com/#alt-downloads
Windows: The System Installer is preferable to the User Installer. However, if the System Installer fails, the User Installer will work.
Lab Computers: If you’re using the lab computers and a thumb drive, you may want to download the Windows zip and install Code onto your USB thumb drive.
-
Launch the installer and complete the installation.
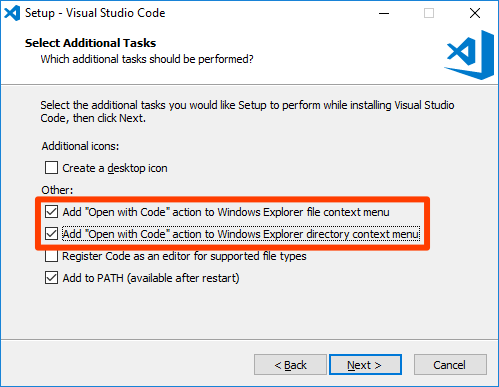
Windows\ You may to check the follow options to make opening Code easier.
Part III: How to Submit Assignments
Note: It may take up to 48 hours for your Git repository to be created once you’ve submitted the form in Part I. You cannot complete this section until your repository has been created from Part I.
In part III, you will use your newly installed or updated course software to learn how to submit an assignment in this course. This is the procedure that you will follow for all assignments this semester.
Overview
We’ll be using Git to download and submit assignments. Specifically, we’ll be using Cornell’s GitHub and the info2300-2020sp organization to distribute assignment files. You may visit main organization’s page here: https://github.coecis.cornell.edu/info2300-2020sp/
Git is a version control system. It allows multiple coders to work on a project at the same time. It also enables you to store many versions of your code. This is great for keeping back-ups.
Git uses its own vocabulary. This is helpful guide for translating between Natural Language and Git.
| Natural Language | Git |
|---|---|
| assignment | repository |
| download assignment | clone |
| save a version of your code | stage (add) and commit |
| submit assignment | push |
| download assignment updates from the instructor | pull (fetch and merge) |
Download Assignment Files (Clone a Git Repository)
As mentioned earlier, we will be using the Cornell’s GitHub to distribute assignments as well as for students to submit assignments. In this section we’ll clone a copy of the assignment repository from the GitHub server to your local computer.
-
If we’ve managed to process your git repository creation request you should be able to visit the following URL to see your personal repository for this lab: https://github.coecis.cornell.edu/info2300-2020sp/YOUR_GITHUB_USERNAME-lab00. Replace YOUR_GITHUB_USERNAME in the URL to your actual Cornell GitHub username. For most of you this should be your NetID.
-
If you’re able to visit this page, then you have a repository. Now it’s time to download a copy of this repository to your computer. This is known in Git terminology as cloning. You’ll be using Code to work with Git. Open Code if it’s not already open.
-
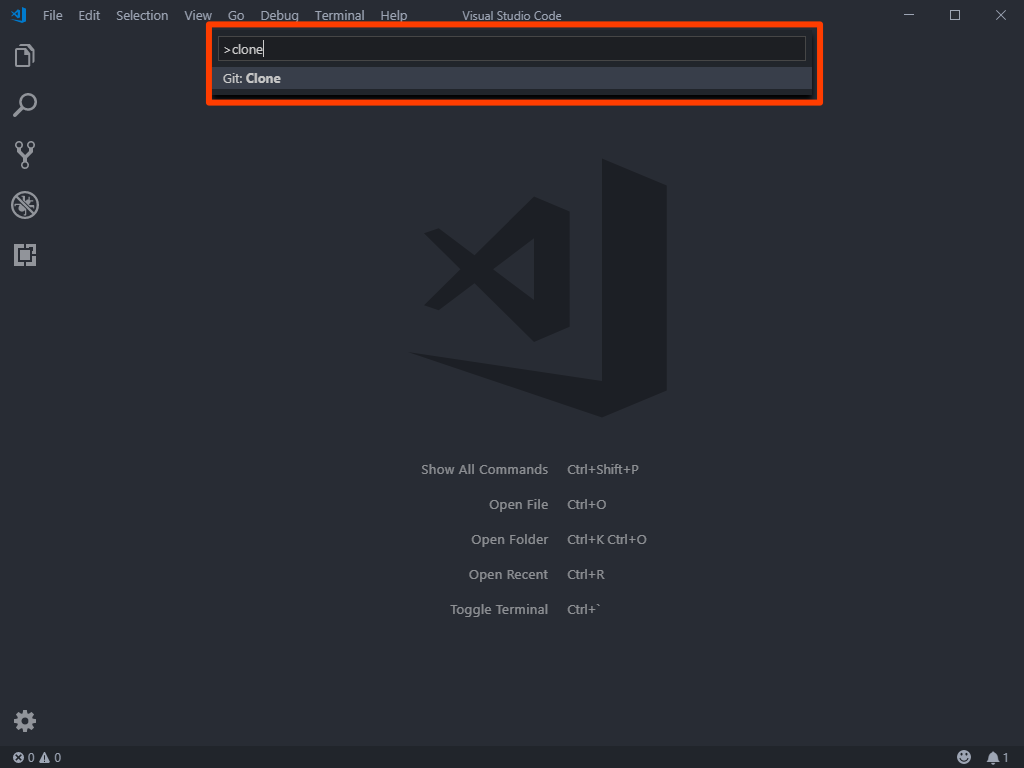
Open the Command Palette in Code (ctrl-shift-p for Windows and cmd-shift-p for Mac).
-
In the Command Palette, type “clone” and select the first choice (Git: Clone) by pressing enter or return.
-
In the the “Repository URL” field, enter the following URL:
git@github.coecis.cornell.edu:info2300-2020sp/YOUR_GITHUB_USERNAME-lab00.git. Replace YOUR_GITHUB_USERNAME in the URL to your actual Cornell GitHub username for most of you this should be your NetID. Press enter to confirm. -
When prompted where you want to store the repository, pick a folder on your system where you will store all of your INFO 2300 repositories.
IMPORTANT!\ Windows users: DO NOT CLONE TO A LOCATION BACKED UP BY ONEDRIVE! Doing so will prevent your PHP server from running!
-
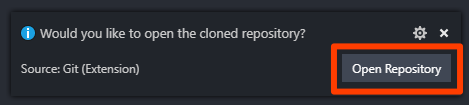
After your repository successfully clones, Code will prompt you to open the Repository. Click “Open Repository.”
-
Once the repository is open in Code (See NETID-lab00 in the Explorer), it will prompt you about recommended extensions. You will need to install these recommended extensions in order to complete this assignment. Click “Install All.”
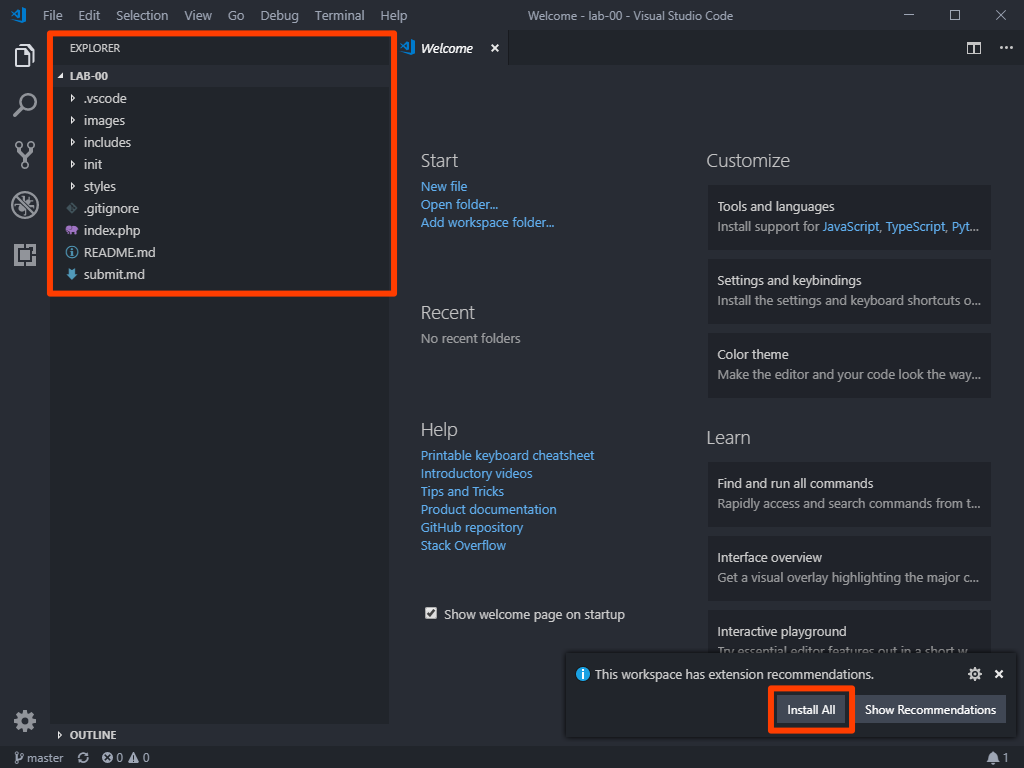
-
Restart Code. You must restart Code for the extensions to complete installation.
Working with PHP in VS Code
-
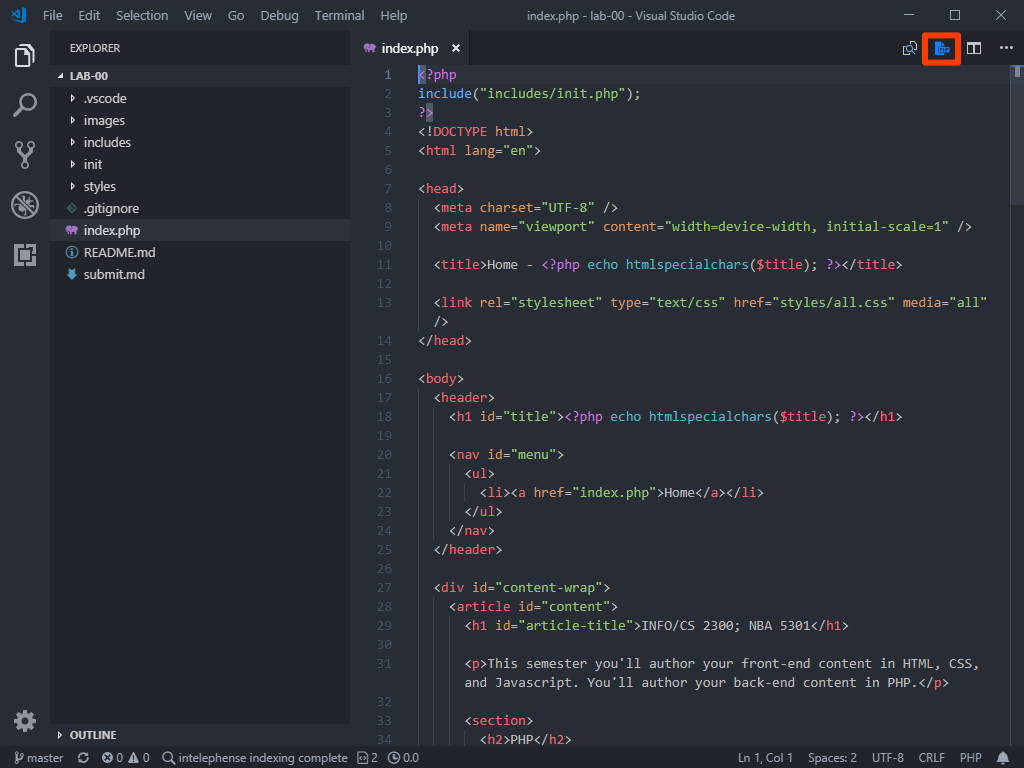
Open index.php in Code.
Observe that this PHP file has lots of HTML in it. In order to view this HTML in a browser you must run a PHP web server that executes the PHP code and outputs a pure HTML web page.
-
To start the PHP web server, you must always open the main page of a web site. In this case it’s index.php. Next click the PHP Server: Serve Project button.
Once the PHP server is started, if you want to make changes to a page, simply refresh the page in the web browser. Do not start another PHP server; only run one PHP server at a time!
Your main web page should now open in your default browser. If this was successful you should see your PHP version and a list of databases.
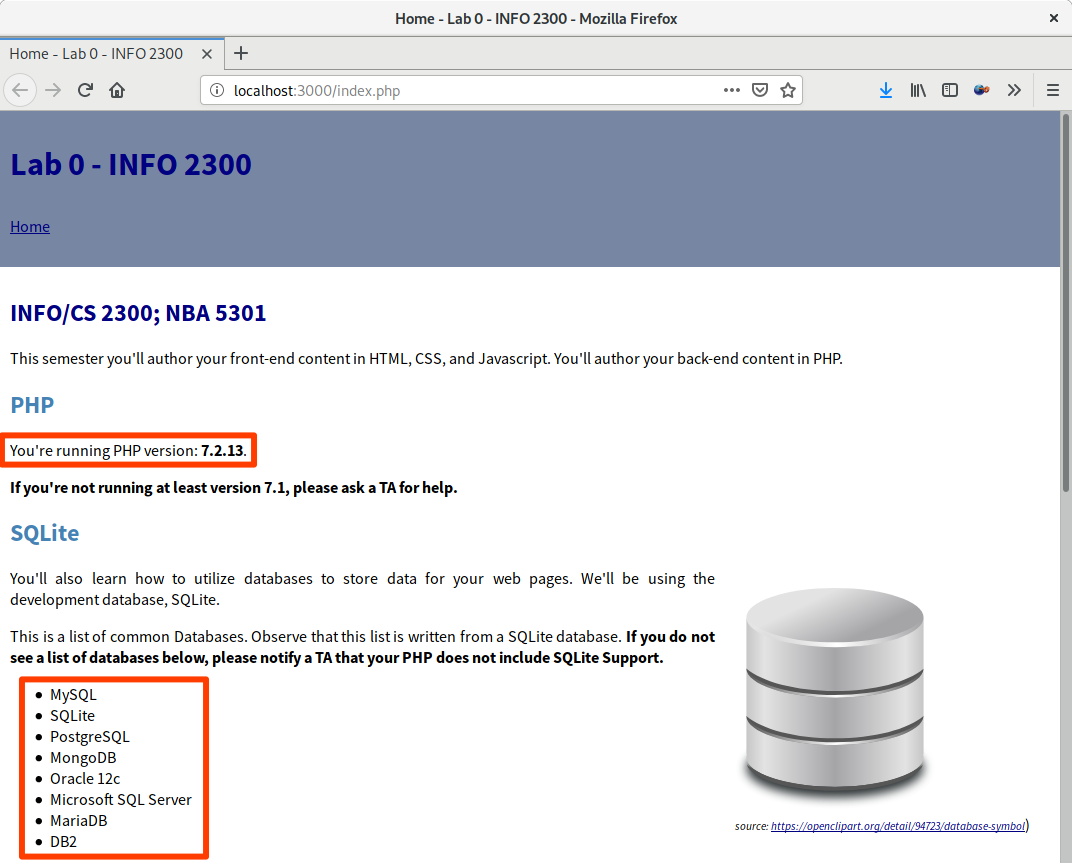
If it wasn’t successful, see the subsections below to help troubleshoot.
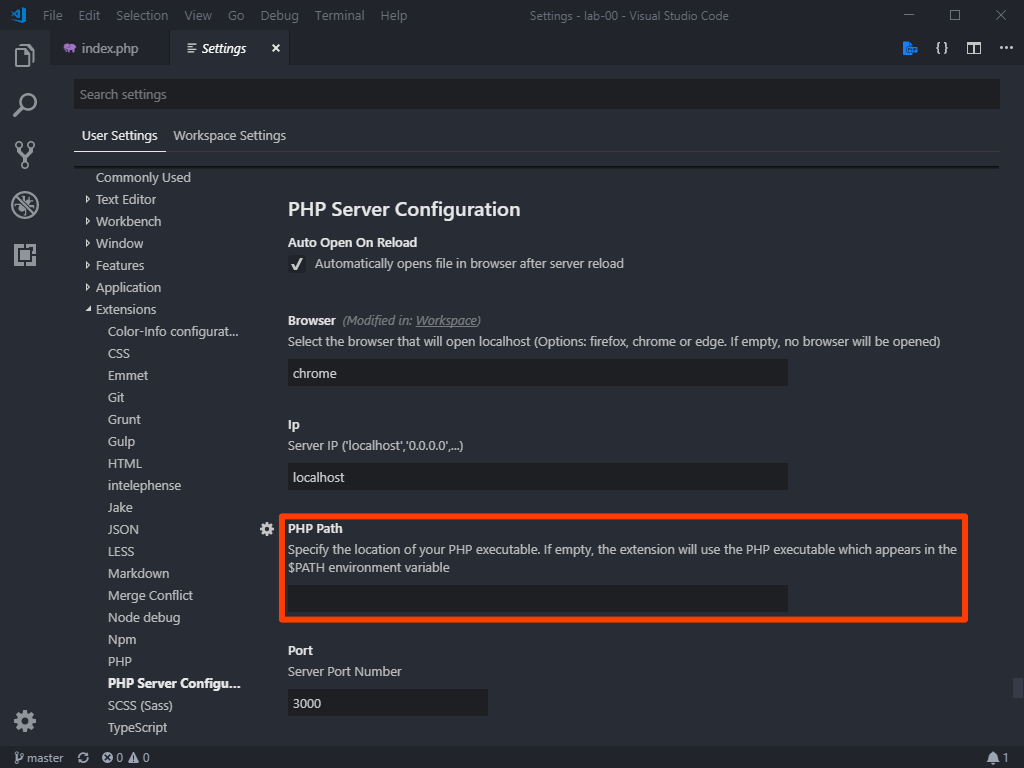
Wrong PHP Error
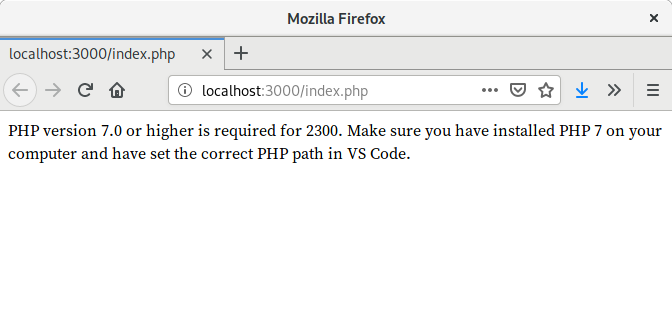
If you receive this error, you’ll need to configure VS Code to use the PHP 7 that you installed in Part II.
In VS Code’s Settings, change the PHP Path to point to your PHP 7 executable. On Mac’s this is usually, /usr/local/php5/bin/php.
Visit office hours if you need help!
No List of Databases
This is usually pretty difficult to troubleshoot. I recommend you visit the instructor’s office hours.
Submitting an Assignment
Once you’ve got your PHP installation working in Code, it’s time to submit your assignment.
Preparing to Submit your Assignment
Follow the directions in the submit.md file in your repository.
-
Open submit.md in Code.
-
Follow the instructions inside of submit.md.
Submitting your Assignment
-
Next, you’ll need to stage your changes. To stage your changes you need to tell Git which files you want to keep a version of.
Open Code’s Source Control pane from the Activity Bar. Then click the + button to stage each file you want to submit. (For Lab 0, this should only be submit.md)
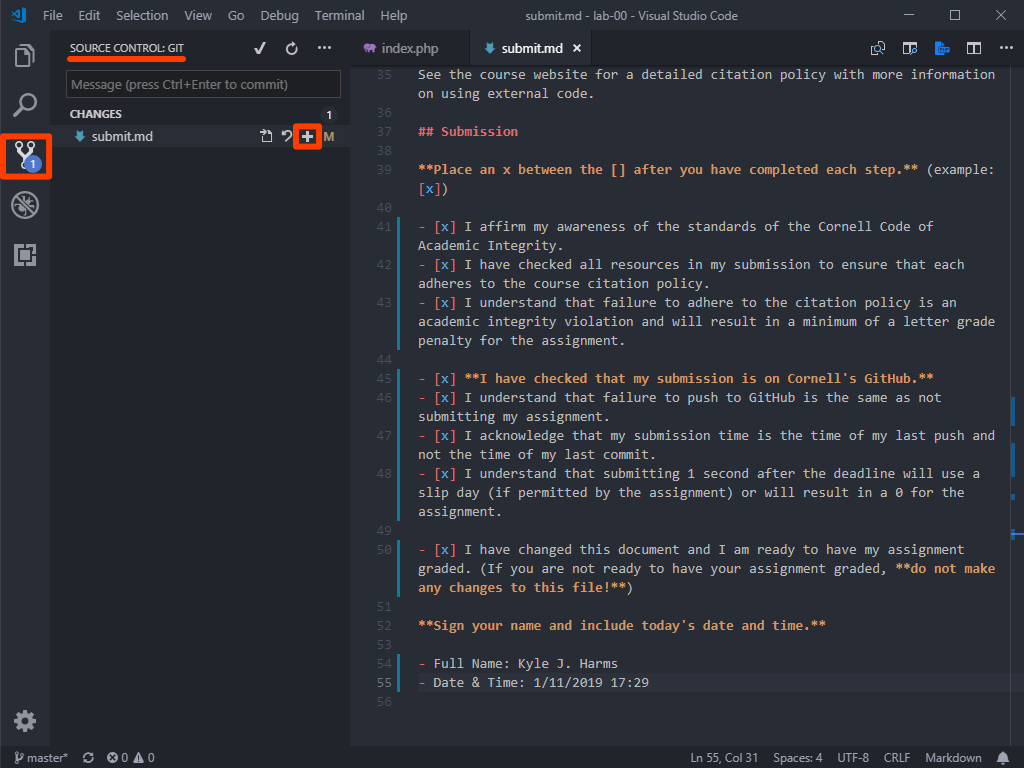
-
Next you’ll need to commit your changes. Write a message about what you are committing and then click the ✓ button to commit your changes. Now your changes are store as a version in your local git repository.
In a version control tool sometimes you need to go back and find a previous revision. Writing accurate commit messages can later help you find that revision.

-
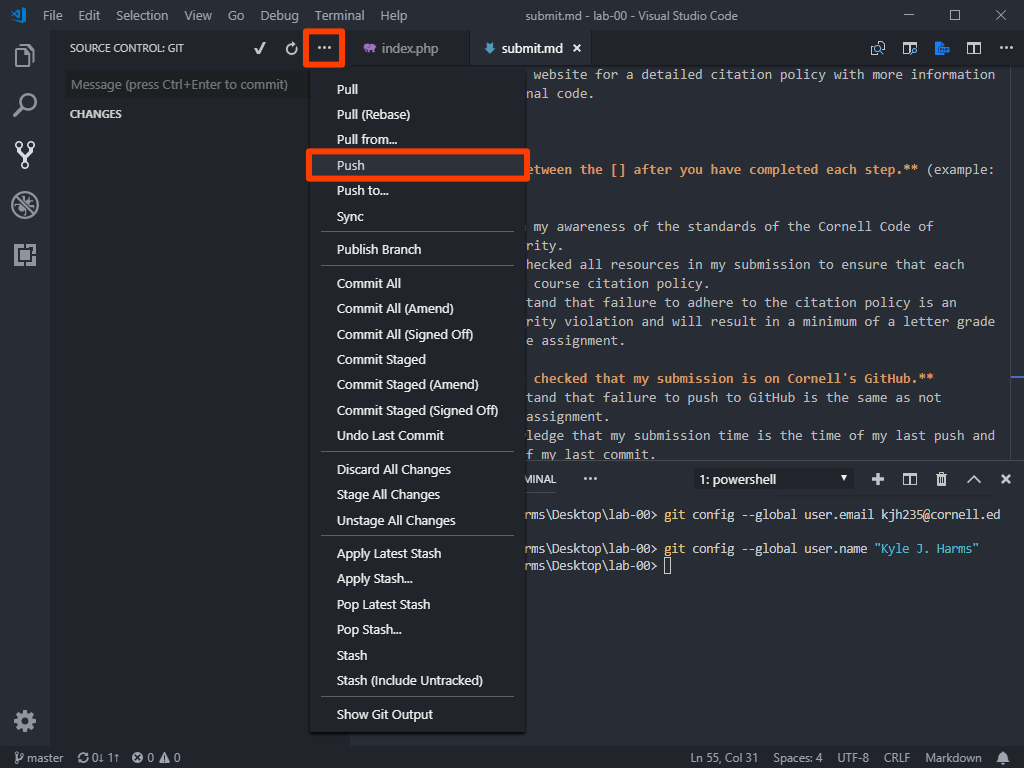
Now you’ll need to push your commits to the Git server (GitHub). From the Source Control menu select Push. Your commits will now upload to the Git server (GitHub).
After committing your changes, keep in mind that the commit is currently only on your computer. You’ll need to send these changes back to GitHub so that you can share them with the course staff.
-
Lastly, log in to GitHub, visit your repository, and check that your submission is complete.
You should see the submit.md file that you signed.
NEVER SKIP THIS STEP WHEN SUBMITTING ASSIGNMENTS! Forgetting to push your assignment is equivalent to not submitting it. This is never considered a valid excuse in this class. The submission instructions explicitly instruct you to check your submission. If you fail to do so, you do so at your own risk.
-
You’re all done. You’ve successfully submitted your assignment. Welcome to INFO 2300! :)
Contributors
The following individuals made contributions to this assignment.
- Kyle Harms
- Grant Storey
- Sharon Jeong