info2300-2020sp-website
Lab Homework 5: Component Library & SQL Queries
You’ll create an example component from your design pattern analysis from last week and share it with the class. You’ll also plan, create, and populate a database.
Learning Objectives
- Contribute to the course Design Pattern Component Library.
- Learn how to create a development database using SQLite.
- Write SQL queries to retrieve information from a database.
- Retrieve information from a database using SQL from PHP (PDO extension).
Deadline
| Lab Homework | Deadline | Slip Days | Credit | Solution |
|---|---|---|---|---|
| All Parts | Sun 3/1, 11:59pm | Max: 2 days | 20 points (completion) | Provided |
Instructions
-
Clone your lab repository.
Clone the following URL:
git@github.coecis.cornell.edu:info2300-2020sp/YOUR_GITHUB_USERNAME-lab05.git\ Replace YOUR_GITHUB_USERNAME in the URL with your Cornell GitHub username. -
Sign the attendance sheet.
It is your responsibility to sign the attendance sheet before you leave. If it wasn’t handed to you, ask to sign it. No signature on the attendance sheet will result in an immediate 0 for this lab’s attendance grade. Forgetting to sign the attendance sheet will not be considered a valid excuse to have your lab attendance corrected.
-
Work together.
Work with your peers to complete this lab. Talk aloud, discuss, troubleshoot problems. You are encouraged to work together so long as you do your own work and you don’t give away answers.
-
Submit.
When you’re finished, follow the instructions in submit.md to submit your assignment.
Part 0: Fix Project 2 Repository
I made a mistake with your project-2 repository. This mistake will prevent you from submitting (commit and push) your database.
Open .gitignore in your project-2 repository and remove the following lines:
### Ignore development databases.
# DO NOT REMOVE THIS! Development database should not be checked-in to revision control.
*.sqlite
*.db
Save the changes. Commit and push.
These lines will prevent you from submitting your database. We cannot grade p2m2 or p2fin without your database! You must remove these lines otherwise you won’t be able to commit and push your database.
I strongly encourage you to double check your p2m2 and p2fin submissions to ensure that your database was pushed to GitHub. No database on GitHub means close to a 0 for your Project 2 grade. This is your notice.
Part I: Design Pattern Snippet Library
In last week’s lab you analyzed several online image galleries and identified common design patterns for online galleries. For example, you may have identified a design pattern for removing an image from the gallery: Tuck the delete feature away in a menu.
All that you need to code up most of these design patterns is what you learned in INFO 1300: HTML, CSS, and some JavaScript. For example: Create a menu using an ul element, hide it using CSS, and show the hidden ul using JavaScript when the user clicks on your menu button.
You’ll want to use these design patterns on your Project 3. However, Project 3 is tough. Project 3 requires that you code an image gallery and support user access controls (e.g. only the user who added an image may delete it, etc.). Because the technology involved in Project 3 often catches many students off guard, we’re going to help you prepare by working on some of the design now! Hopefully, this will help you focus more on the technology and a little bit less on the design when you’re actually working on Project 3.
Objective: Form a team, identify a reusable component from the image gallery design patterns, code an example component, and share the component with the class!
Example Components
What example component do you want to add to the 2300 Design Pattern Component Library?
Think back to your discussion last week. Open a few image galleries and review their designs. Identify small components that you might want to use in your own image gallery in Project 3. For example, let’s say you select the button components for creating an album or uploading a photo. So you might code this:

Now, take a moment and ask yourself, “These buttons really attract my attention, did any of the galleries we analyzed last week use buttons with these hard edges?” Answer, probably not. It’s important to pay special attention to the design details, not just the larger workflow of these patterns. In fact, this design pattern came from Google Photos; it looks nothing like the implementation above:

Yes, they are still buttons, but they don’t have the hard edges and when your mouse hovers over them they turn a slight blue color and change the cursor (using CSS) to use cursor: pointer;.
For your example component you might decide to implement a button with an icon on the left, text on the right, no border, and that changes the style when hovered over (CSS pseudo selector :hover).
Here are some examples of components that I heard you all discussing last week:
- Buttons with icons and without borders.
- A round “+” button (add image to gallery, share, delete, etc.)
- Toolbars with icons (e.g. image detail view in Google Photos for share, edit, delete, etc.). Tip: flexbox
- 3 dot menu button.
- Drop down menu with delete menu item.
- “Next” and “Previous” buttons that have no border, just ‘<’ and ‘>’.
- Search text field with search icon on left side with placeholder example search (see Google Photos).
- Check box that appears when hovering over thumbnail (e.g. Google Photos).
- Popover confirmation dialog that asks if you want to permanently delete a photo.
Implementation
You are not expected to work on this by yourself. Form teams. You pick the size of the team. I would suggest you pick a team that is interested in implementing something you are interested in using in your Project 3 gallery.
Objective: Sit with your team and code an example component. Your team picks the example component you want to create. Don’t pick something too complicated; you need to finish this within the hour and share it with the class.
A couple of restrictions:
- Client-side only implementation. No PHP.
- Use only HTML, CSS, and JavaScript. Try to use methods that only require HTML and CSS if you can.
- You may not use any HTML, CSS, and JavaScript libraries except jQuery.
- You may reference other sources, but the code should be your team’s own work.
Share It!
Once you are finished coding your example component, as a team:
- Take a screenshot of the example component.
- Create a Campuswire Note post with the Component Library category.
- Title: A descriptive title for the component.
-
Post Body: (Tip: Campuswire posts accept Markdown.)
- Write a short description of your component.
- Include the screenshot.
-
Include the HTML, CSS, and JavaScript snippets needed in Markdown.
How to write code snippets in Markdown:
HTML:
```html <button>Upload</button> ```<button>Upload</button>CSS:
 ```css
 button { background-image: url(../images/add.png); }
 ```
button { background-image: url(../images/add.png); }JavaScript:
 ```javascript
 // Remember to include jQuery first!
 $("button").keydown(function() { ... });
 ```
// Remember to include jQuery first! $("button").keydown(function() { ... }); - Include the contributors of your component. At a minimum please post all of your NetIDs. You may include your names if you like.
You are encouraged to reference and use these example components in your own work. However…
Important! You may not copy and paste these components into your own code; copy and pasting these components into your own code is considered academic misconduct. You may use the example components in the 2300 Design Pattern Component Library as a reference in your own code so long as you write the code yourself (not copy and paste) and follow the External Code Policy for this course.
Part II: Plan, Create, and Populate a Database
This is intended to be homework. In this part, you’ll practice planning, creating, and populating a SQLite database. This process will help give you the tools you need to work on Project 2, Milestone 2. To help you develop these skills, you’ll be working on an employee database for Willa Bend’s Popcorn Stand.
Plan Database Schema
Objective: Before you create a database you must plan it first. Databases can be difficult to change after they’ve been created. For this section, you’ll be planning the database schema for an employee database.
It’s easy to create a database that records every little detail. This may seem like good idea too. But recording and maintaining a database is a lot of work. It’s often best to keep track of only the information you need. In this case Willa Bend wants to use this database to keep track of which employees are staff and which employees are managers. Willa Bend also keeps tracks of all employees with employee IDs that look like your NetID.
Objective: Write out your schema for the database in popcorn.md. Review your notes from the lecture or ask your neighbor for their notes if you’re not sure what to do here.
Tip 1: We usually use all lowercase letters and underscores for names in web development.
Tip 2: Don’t forget to include the id primary key. This is convention that many web frameworks use. It’s a good idea to get in the habit of using it!
Create & Populate Database
Objective: Now that you have a plan, your schema, it’s time to create your database.
-
Open DB Browser for SQLite.
-
In the toolbar, select New Database.
-
Save your database in the secure folder of your Lab 5 repository as popcorn.sqlite.
-
You will then be prompted to create a table for your new database. Using the schema you created in popcorn.md, create the table.
Make sure you use appropriate constraints. If you don’t remember what constraints are, review your lecture notes or ask your neighbor for their notes.
-
Once you’ve created the table, populate the database with at least 5 employees from the Browse Data tab. See the sample data below. Make sure you get a mix of staff and managers!
Note 1: You may need to make up information for fields that you have in your schema that’s not listed below.
Note 2: You may not have employee names in your schema. If that’s the case, just ignore the name data below.
| Employee ID | First Name | Last Name | Position |
|---|---|---|---|
| ag607 | Anthony | Gonzalez | staff |
| hr255 | Hector | Rivera | manager |
| ed3450 | Alecia | Johnson | staff |
| rap30 | Randall | Pearson | staff |
| aw123 | Anne | Wheeler | manager |
| kis344 | Keala | Settle | staff |
| mbj22 | Michael | Jordan | staff |
| cab40 | Chadwick | Boseman | staff |
| csk17 | Chloe | Kim | staff |
| mak33 | Maia | Shibutani | staff |
| rug12 | Redmond | Gerard | staff |
| nc632 | Nathan | Chen | manager |
| mnm74 | Mirai | Nagasu | staff |
| law101 | Letitia | Wright | manager |
| hj397 | Hugh | Jackman | staff |
- Save your work! Select Write Changes to save your database.
Execute SQL Queries
Objective: Now that you have created your database, it’s time to retrieve information from it by writing some SQL queries. For each of the natural language queries below, write the SQL for the query in the Execute SQL tab. After you’ve typed the query, press control/command + enter/return to execute your query. Next check the results to make sure your query returned the correct records. If your SQL query returned the proper results, copy and paste your query into popcorn.md. If it failed, fix your query and try again.
Tip 1: If you get stuck, refer to the examples below.
Tip 2: SQL keywords (i.e. SELECT, FROM, WHERE, LIKE, etc.) are usually written in uppercase letters.
Tip 3: Don’t forget to terminate each SQL query with a semicolon (;).
Queries
-
get all fields for all employees
-
return two fields (e.g. first name, last name) for employees that are staff
-
return a natural key for employees who are managers
-
return all fields for the employees who’s first name starts with a
-
return all fields for the employees who’s last name ends with n
-
return all fields for the employees who have an l anywhere in their last name.
-
return a natural key for employees who are staff and who’s first name starts with c.
Examples
Select all fields and all records from a table.
SELECT * FROM movies;
Return two fields from a table.
SELECT title, director FROM movies;
Get values where they equal something.
SELECT * FROM movies WHERE rating = 'PG';
Get values that start with ‘t’ and end with anything else (wildcard).
SELECT * FROM movies WHERE title LIKE 't%';
Get values that end with ‘s’ and start with anything else (wildcard).
SELECT * FROM movies WHERE title LIKE '%s';
Match two conditions.
SELECT * FROM movies WHERE rating = 'PG' AND title LIKE 'b%';
Part III: Using a Database with PHP
In Part III you’ll query a database to generate content for the 2300 Shoe Review. When done, your show review page should look similar to the one below.
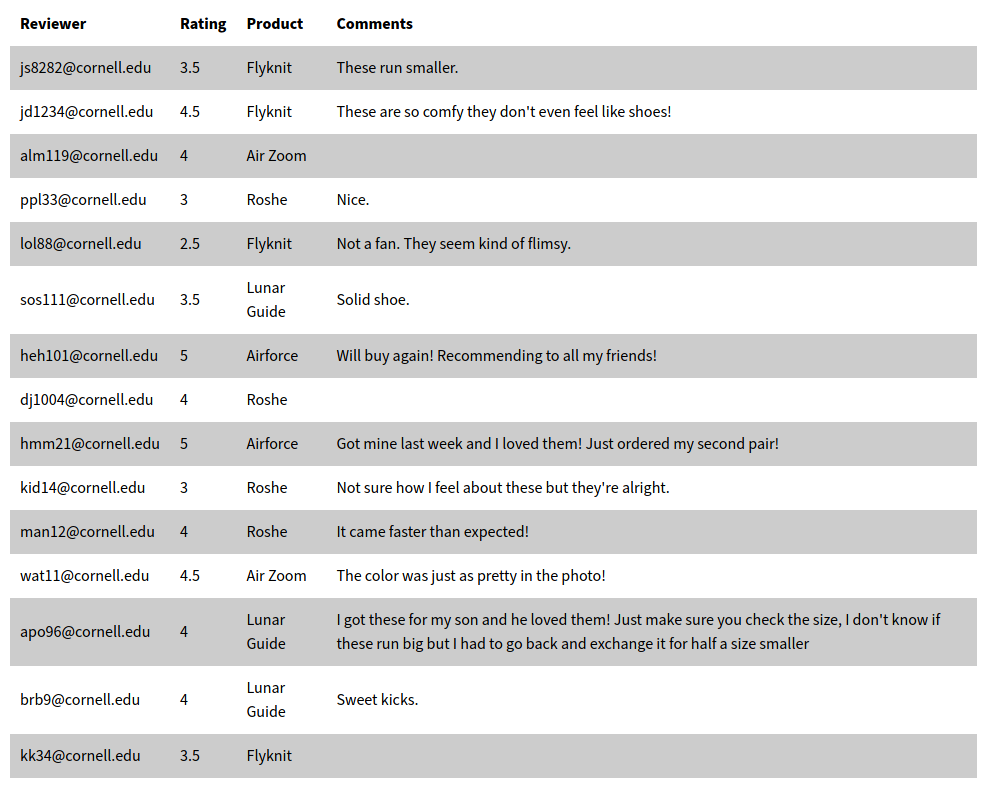
Look Over the Database and Code
Objective: The Shoe Review already has some reviews from customers, it’s currently stored as secure/shoes.sqlite. Take a moment and open shoes.sqlite in DB Browser for SQLite. Look over the schema for the database. Look over the data. Once you get a sense of what’s in this database, look over the code for shoes.php.
Connect to the Database
The first step to working with a database in PHP is to connect to the database. To do this you need to use the following piece of code replacing PATH_TO_DATABASE with the actual file name of the database.
$db = open_sqlite_db(PATH_TO_DATABASE);
open_sqlite_db() is a user defined function declared in init.php. You should probably use this function in your code. If you’d rather use PHP’s PDO extension directly, you can use this code:
// open connection to database
$db = new PDO('sqlite:PATH_TO_DATABASE');

// Throw an exception for incorrect SQL, instead of being silent.
$db->setAttribute(PDO::ATTR_ERRMODE, PDO::ERRMODE_EXCEPTION);
The first line of this code connects to the database and stores the connection to the database in the $db variable. The variable $db is of type object. So far you’ve only learned about the PHP types of boolean, integer, float, string, array, and NULL. Object types have helper functions attached to the type. We use the $var->function() syntax to call these object helper functions. Observe that in the second line of code we use the $db variable (which is of type object) to call the object’s helper function, setAttribute().
Normally, when you write a query in PHP if your SQL query is invalid, you’ll get a boolean saying it’s invalid. This isn’t very helpful because you don’t know what’s incorrect about your query. We can instead make PHP throw an error if your SQL is invalid. That’s what this line of code, $db->setAttribute(PDO::ATTR_ERRMODE, PDO::ERRMODE_EXCEPTION);, does.
Objective: Write the code at the top of shoes.php to connect to the database. Store the database connection in a $db variable.
Query the Database
Now that you’ve connected to the database, we’ll want to query the database and retrieve some records.
Here’s the PHP code for making a query:
$sql = "YOUR SQL QUERY GOES HERE;";
$result = exec_sql_query($db, $sql);
exec_sql_query() is a user defined function declared in init.php which uses PHP’s PDO extension. This code is basically what exec_sql_query() does using direct function calls with PDO. Check the code out for yourself.
You should probably use the exec_sql_query() function. If you don’t want to use exec_sql_query(), you may call PDO directly as shown in init.php.
Objective: Write the PHP code for querying all the records in the reviews table, in shoes.php.
Output Query Results
After querying the database, we’ll need to take the results of the query and generate an HTML table.
To get the actual records, use this code:
$records = $result->fetchAll();
This asks the $result object to fetch all the database records and stores them as an array in the $records variable.
$records is a multi-dimensional array. Each record in the $records array is an associative array with the key being the name of the database field and the value being the value of that field for that record.
Examples:
// get comment of first review
$comment = $records[0]["comment"];

// echo reviewer for second review
echo htmlspecialchars($records[1]["reviewer"]);

// get rating for third review
$record = $records[2];
$rating = $record["rating"];
You can loop through all the records using a foreach loop:
foreach($records as $record) {
  print_record($record);
}
Tip: You’ll want to use user defined function: print_record($record). See the example for accessing the third review above for how you might print a record.
Contributors
The following individuals made contributions to this assignment.
- Kyle Harms
- Sharon Jeong
- Sophia Wang