training-labs
Lab 3: Sending Data over LoRaWAN
The goal of this lab is to connect and send data from IoT hardware to an internet application over LoRaWAN. In this training, you will acquire the skills to load and decode made-up data, which are the key steps in ensuring the smooth operation of IoT devices. This stage is crucial in determining the success of both lab training and team projects.
Objective
By completing this lab, you will be able to:
- create an application on The Things Network Community Edition (TTN)
- register a device to a TTN application
- modify a starter Arduino sketch to connect to your application
- load made-up data into data packets
- decode your made-up data on TTN
Prelab
Please work until the “Lab 3 Start” section before the Lab 3 Friday session.
Please also review the Datatype Intro, Numbers/Structures Intro and Lab3 Alternative Document.
Background Motivation
The Internet-of-Things (IoT) describes the growing network of traditionally non-Internet-connected physical objects that exchange information with other entities on the Internet (including other Internet-connected physical objects). This opens up the traditional usage of those objects to unprecedented levels of insight and autonomy. For example, IoT-based residential heating systems can download the real time hourly electricity pricing and weather forecasts from the Internet, optimizing their power consumption over the day. Or IoT-based roadside air quality sensors can auto-upload the real time data to the cloud, enabling viewability of data from several locations at once.
In an IoT network, each device usually does not directly connect to the Internet. Instead, devices at the end nodes of the network may communicate only with a central device ( a “gateway”), and the gateway transfers data to and from the Internet. This may be a suitable architecture when other Internet-connected node(s) are not available near the end-node, or when the power/data overheads for maintaining direct Internet connectivity for each end-node device tend to be high. We will focus on this architecture in this lab, due to the tendency of IoT applications in rural areas (like Tompkins County) to be driven by low power requirements and the need for transmission over long distances to cross areas with poor Internet coverage.
When designing such an IoT network, you are faced with an important decision: how will you transmit data to a gateway? Methods like WiFi and Bluetooth are designed for high data rates (10Mbps to 2Gbps), but at the cost of limited range (100-300ft) and high power consumption (hours to days on a single coin cell battery). What if the sensors have to be placed further away from the gateway, or lower power consumption is required?
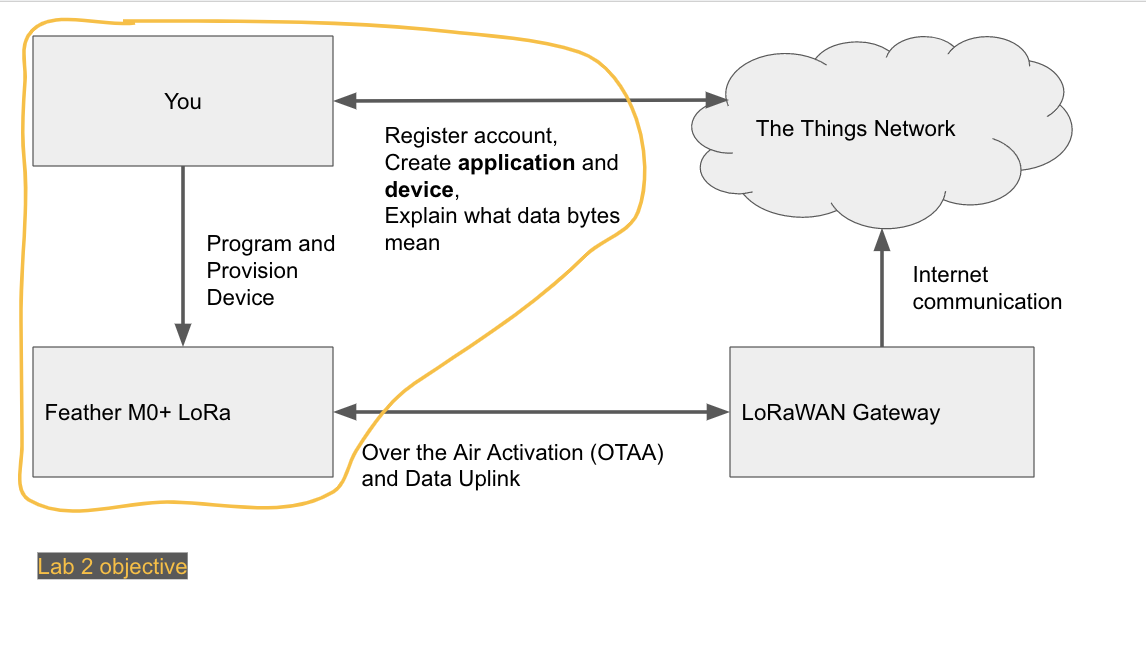
Enter LoRa. This is a technique that modulates radio waves at sub-gigahertz frequencies (typically 915MHz in North America), instead of the 2.4GHz or 5GHz used in Bluetooth and WiFi. Generally for a given signal power, using a lower-frequency carrier wave increases the range, but lowers the data rate. LoRa gateways can transmit and receive signals across 10 miles (rural areas) and up to 3 miles (urban areas). LoRa transceivers are also heavily optimized for low power consumption, being designed to last up to 10 years on a single coin cell battery. If your project requires ranges greater than a few hundred feet, and it is sufficient to just send a few bits of data at a time (0.3Kbps - 27Kbps), then LoRa might be the data transmission method for you. In this lab, we will explore what it takes to send data packets to the Internet using LoRa. We will first assemble a data packet, using a microcontroller with an onboard LoRa transceiver (Adafruit Feather M0 LoRa). We will then transmit the data packet to a gateway on campus via the LoRa Wide Area Network protocol (LoRaWAN). The gateway receives the data through LoRaWAN and sends it to The Things Network (TTN), a network of Internet servers optimized to receive data from such LoRaWAN gateways. TTN provides a convenient interface online to track, visualize, and process the data. We will then use the tools in TTN to decode our data, and explore sending data packets containing multiple data types.
A visual of the Lab 3 objective appears below.
Double-check Your Parts Kit
First, check that you have all of the starter kit parts. See the parts list here: Training Kit.
Create a The Things Network Application
Start by creating an account with The Things Network (TTN). Choose “Sign Up” then “Join The Things Network” (found at the left side of the page in 2024).
You will now create your first application on your account. An application is what your devices communicate with on the Internet. Specifically this is just a piece of software, hosted on a server somewhere in the Internet, that “listens for” your device and knows how to “talk to” it.
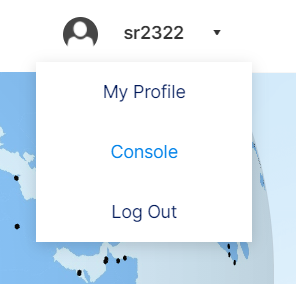
First, navigate to the TTN Console.
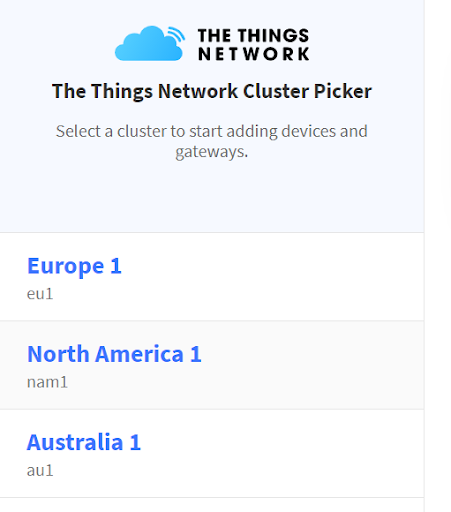
Select North America 1 (nam1) as the cluster. You can also get to the nam1 console with this URL.
Select “go to applications”, and then “+Add application”. The following page should come up.
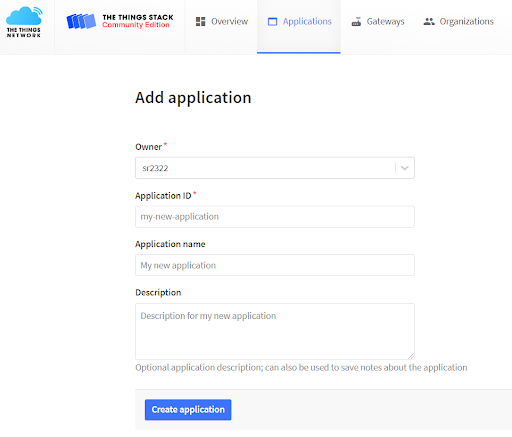
Put in your netid in the Owner field. Come up with a unique name for the
application ID. Note that TTN will prevent you from creating the
application if the application ID is the same as one currently
hosted on TTN. Try
Hit “Create application”. You have now created your first TTN application!
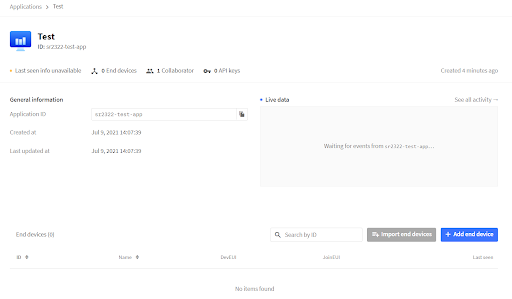
Now to add some end devices for it to communicate with. Click on “+ Add end device”. On the next screen, choose the “Manually” option. Enter the settings as shown below in the table and image.
| Setting Name | Value |
|---|---|
| Frequency plan | United States 902-928 MHz, FSB 2 (used by TTN) |
| LoRaWAN Version | MAC V1.0.3 |
| Activation mode | Over the air activation (OTAA) |
| Additional LoRaWAN class capabilities | None (class A only) |
| Network defaults | Use network’s default MAC settings |
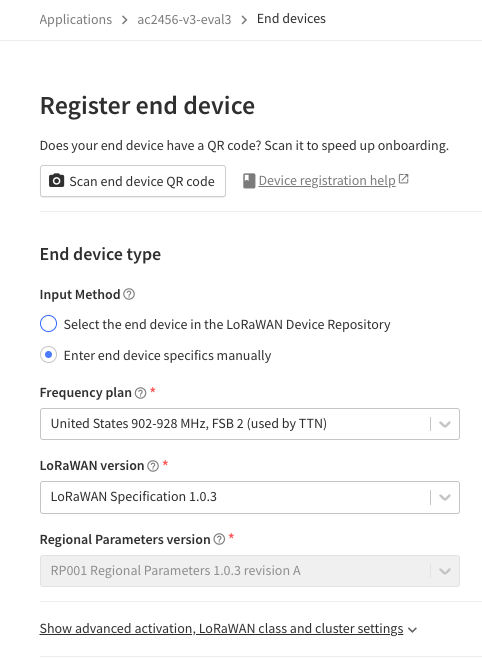
First, we’re going to set the frequency plan to the default set of frequencies assigned to LoRa in the US: 902-928 MHz. Within this, we will use sub-band 2 (903.9-905.3 MHz), which is commonly used by TTN.
Activation is a process by which an address is assigned to a device. In Over-The-Air-Activation (OTAA), devices request and receive a dynamic device address and security keys from the network. There are other activation methods such as Activation by Personalization (ABP), in which the device address and security keys are static and hardcoded onto the device. However, OTAA is the preferred and most secure activation method for TTN.
LoRaWAN is a protocol for data transfer at the “media access control” (MAC) layer. In other words, the LoRaWAN protocol dictates how hardware transmits and receives data on the LoRaWAN network by modulating radio waves. The current TTN architecture is designed for version 1.0.3 of the LoRaWAN MAC protocol.
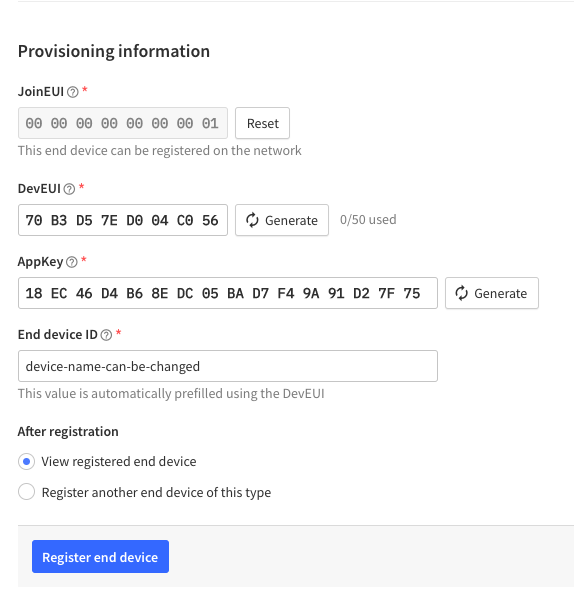
Next, we will obtain some identifiers so the application and device can recognize each other. An end device needs to present a 64-bit device identifier (DevEUI) in conjunction with a 64-bit application identifier (AppEUI) for TTN to direct incoming data from a device to the right application.
Your DevEUI can be randomly generated by TTN by hitting the  button in the DevEUI field.
As for the AppEUI, you can use 00 00 00 00 00 00 00 01 for your first application. Once you have both EUIs, put them in as shown below and give your device an appropriate name. You can add a description if you like.
The last identifier we need is an AppKey. This is a security measure
(like a password), and serves to prevent unwanted third-party access
to your TTN application if your AppEUI and DevEUI are compromised.
The AppKey is randomly generated by TTN: hit the
button to generate the
AppKey.
It is important that you keep the AppKey secret as it provides encryption and authentication for your device’s messages. You can always regenerate the AppKey in the device’s Console Settings if you think you may have leaked the key (for example, by accidentally uploading it to a public or semi-public GitHub repo). You may also regenerate the Device ID on that same page.
On the next page, you’ll see your EUIs. Congratulations, you have now set up your first device and application on The Things Network! As a final note, the course staff are best able to help you if you add them as collaborators to your test app. You can do this on the “Collaborators” page. If you add course staff as collaborators, please give them permission to modify collaborators so that they can remove themselves at the end of the course.
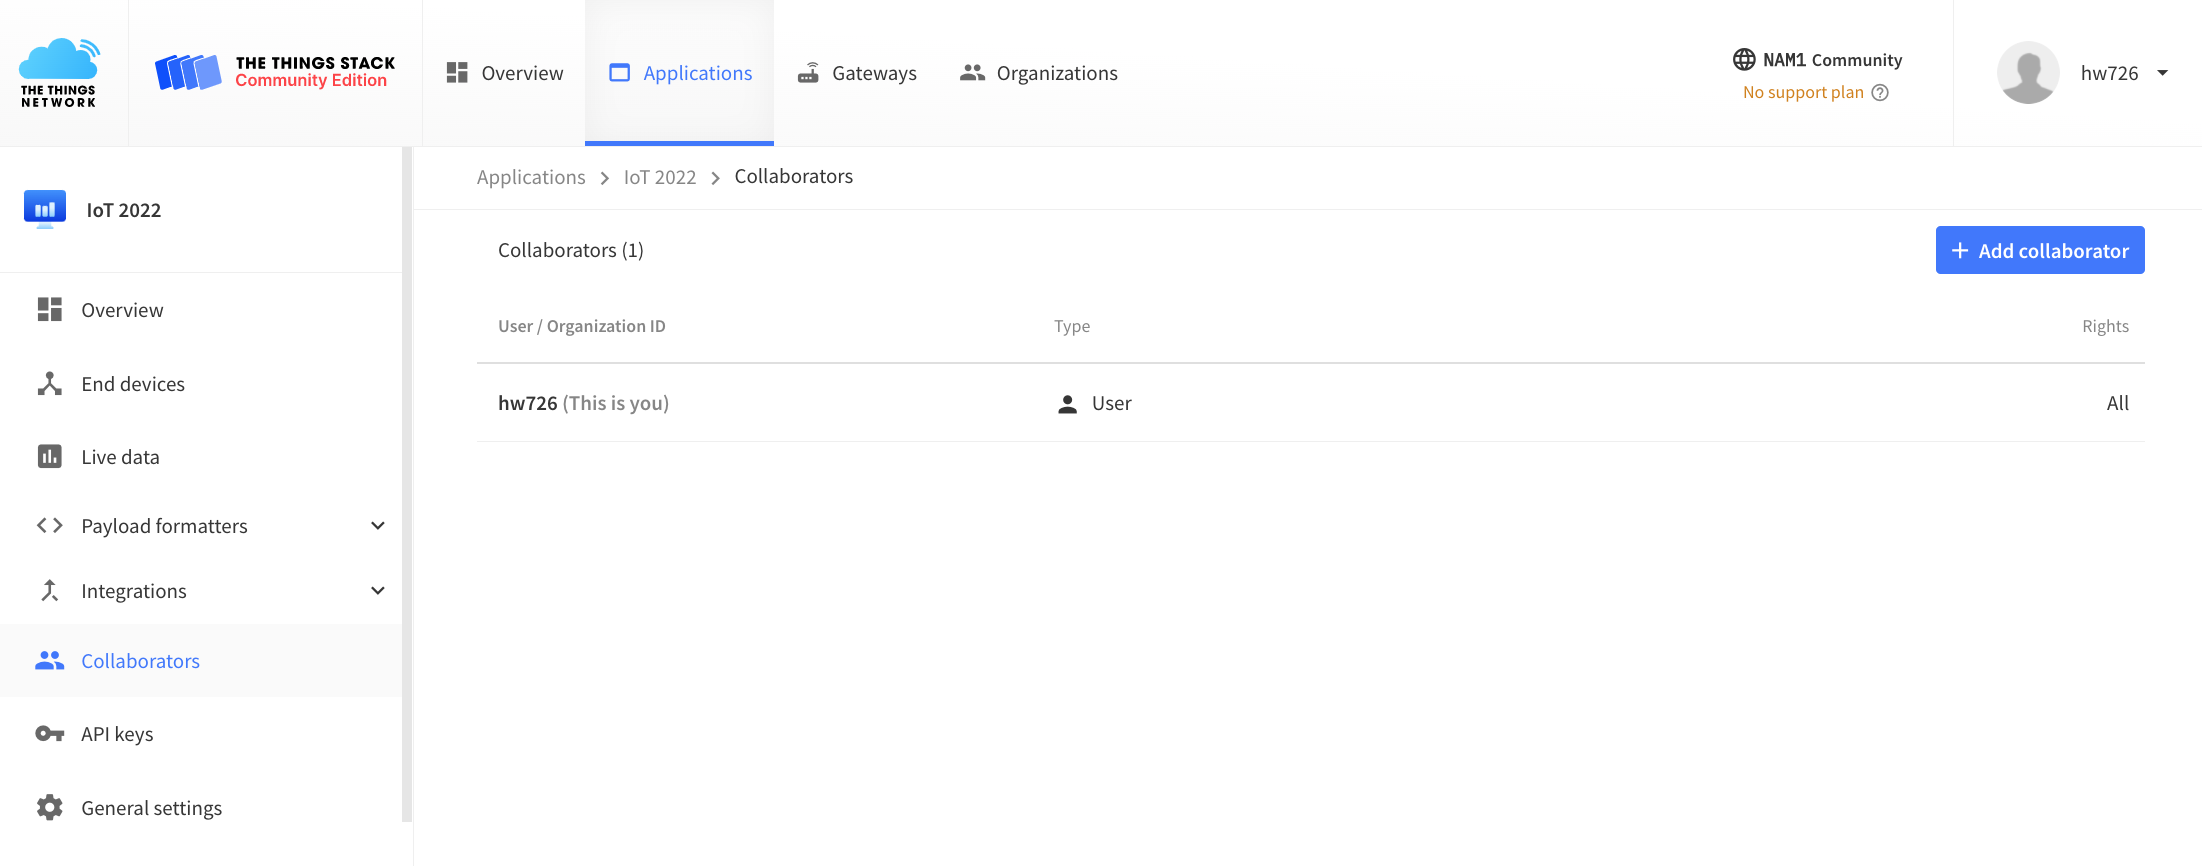
The course staff use their netids as usernames.
Lab 3 Start
Initialize Your Device to Connect
Now we are going to set up the Feather to connect with the
application that you just made on The Things Network. The first step
is to write the three identifiers you generated in the Prelab to the
Feather’s flash (i.e. permanent) memory. Each identifier is an array
of bytes (8-bit integers), with each byte represented in hexadecimal
form. Clone or download the following repo. If you download the starter
code as a .zip file from GitHub, make sure to rename the unzipped folder
to ttn-otaa-highlevel.
https://github.coecis.cornell.edu/LPWAN-Training/ttn-otaa-highlevel
In that repo, there are two relevant files: a starter Arduino sketch
(ttn-otaa-highlevel.ino) and a starter header
file, keys.h.in. Rename keys.h.in to keys.h.
For TTN Console to recognize our application, place our three identifiers from TTN into the header file, in a form that can be read by your Feather end device. Navigate to the TTN Console, then to your application, and finally to your end device. You will find your three identifiers in the “Activation Information” section.
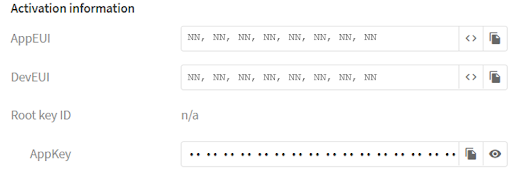
The “NN”s are just placeholders in the screenshot; you should see actual numbers. For context, these are hexadecimal (base 16 integer) representations of bytes (base 8 integers). First thing we want is to put these in standard hexadecimal format, so click the <> button for each. You’ll need to hit the eye icon for that button to appear next to the AppKey.
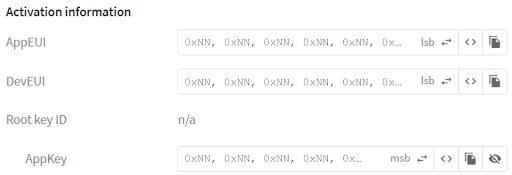
By default, the byte sequence puts the most significant byte first (msb order).
We are going to store these byte sequences in arrays, and when the arrays are
read, the first byte to be read will be the one farthest to the left. However,
the program on the end device (i.e. the Arduino sketch) requires the AppEUI and
DevEUI to be in lsb (least significant byte) order. So we just need to reverse
the sequence of bytes. In the AppEUI and DevEUI fields, just hit the
 button.
Keep the AppKey in msb order. Your three identifiers should now look like this:
Now paste in your AppEui, DevEui, and AppKey from the TTN Console into your
keys.h file. Your keys.h should then look like this (with integers
or letters in place of the “NN”s ):
const uint8_t PROGMEM APPEUI[8] = { 0xNN, 0xNN, 0xNN, 0xNN, 0xNN, 0xNN, 0xNN, 0xNN };
const uint8_t PROGMEM DEVEUI[8]= { 0xNN, 0xNN, 0xNN, 0xNN, 0xNN, 0xNN, 0xNN, 0xNN };
const uint8_t PROGMEM APPKEY[16]= { 0xNN, 0xNN, 0xNN, 0xNN, 0xNN, 0xNN, 0xNN, 0xNN, 0xNN, 0xNN, 0xNN, 0xNN, 0xNN, 0xNN, 0xNN, 0xNN };
Sending Test Data
Before you send any data, we need to identify our device to TTN, by assigning a device address to our device. This is called “activation”, and there are two ways of doing this: have TTN assign our device one dynamically (Over-the-Air Activation or OTAA), or hardcode one into our device (Activation by Personalization or ABP). OTAA is TTN’s preferred and most secure way to connect a device to TTN.
Upload the starter sketch that you have modified in the previous Initialize Your Device to Connect Section to the Feather M0 LoRa and run the device within range of an OTAA-capable gateway, it will join the TTN network and send transmissions once per minute. Note that this works for testing in the short term (e.g. for the labs in this course). In the longer term (e.g. for your projects), you should comply with the TTN Fair Use Policy
In the Arduino sketch, the transmissions are all four bytes long. Each byte
holds 8 bits, i.e. any integer value from 0-255. The four bytes are sent as an
array {N, 1, 2, 3} on the default port (port 1) where N denotes a counter,
i.e. an integer that increments every transmission. You’ll be able to watch the
join request and transmission on the TTN console. Note that it might take a few
minutes for your device to connect to the gateway, but eventually your console
should look somewhat like this:
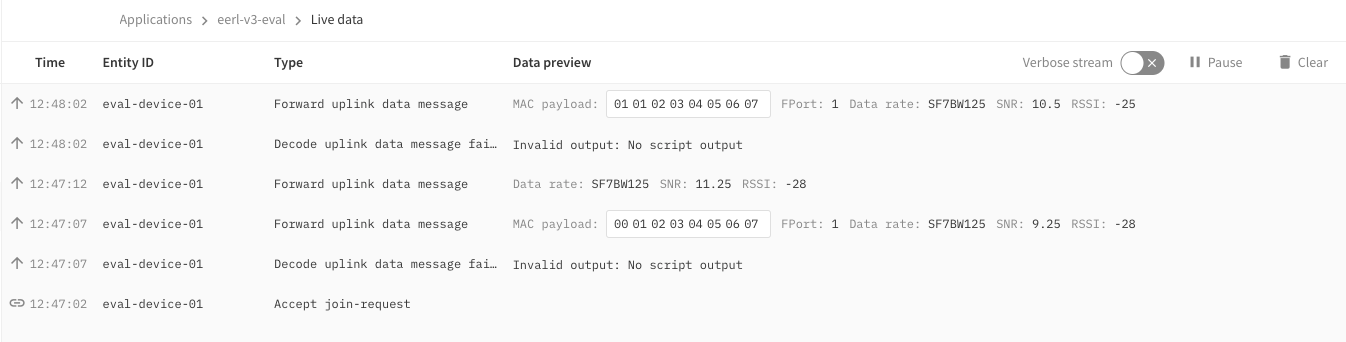
Notice that the payload is just a sequence of bytes. It is up to you to write a decoder to make sense of the payload. For example, a simple decoder could assemble the four 8-bit values into two 16-bit integers (0-65536). A more complex one could dynamically determine which data are present and interpret them accordingly as characters, negative numbers, floating-point numbers, etc.
Decoding Your Sent Data
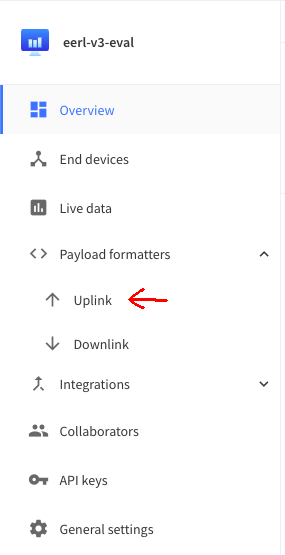
The packets transmitted in your program are simply arrays of bytes. This format is lightweight and great for LoRa transmission, but strips the data of its meaning. So once the data makes it through the gateway and reaches the TTN server on the Internet, we need some way to convert it into a format that we can meaningfully interpret. This conversion is called “decoding”. You can write a custom decoder program within the TTN Console that automatically decodes each incoming byte array from your Feather. Navigate to the “Payload formatters” tab on the side-panel of your application on the TTN Console, and select “Uplink”. Decoders are commonly created in JavaScript, so select that from the dropdown. For reference, the standard format of decoder output is called “JSON”, short for JavaScript Object Notation.
Aside: There are also per-device uplink formatters available. You can find them on the end device’s payload formatter tab, seen near the center of the end device page. The default payload formatter type is probably “Use application payload formatter” but it can be changed to “custom JavaScript formatter” to be separate from the whole-application formatter. The benefit here is that you can copy and paste bytes to test your formatter without having to send bytes over LoRaWAN.
To create a decoder, we first define a function with this prototype:
function DecodeUplink(input)
and it returns a JSON output organized by fields of your choice. For example, the decoder below assembles two bytes (8-bit values) to form a 16-bit value.
function decodeUplink(input) {
  //initialize an object to store output data
  var data = {}
  //create a field “myint16” for the data object
  //and then put together the 1st two 8-bit values in the input to make a 16-bit value
  data.myint16 = input.bytes[0] + (input.bytes[1]<<8);
  //return the output data along with any errors or warnings
  return {
    data: data,
    warnings: [],
    errors: []
  };
}
We are definitely sprinting through some JavaScript syntax here, but it is designed to be an intuitive language, and we highly recommend TTN’s tutorial. Note that adding a “//” preceding a line of text is a way to comment it out – i.e. to tell TTN to ignore that line instead of trying to run it as code. The “«8” is a bit-shift operator that shifts all the bits in a binary number by eight places to the left.
Sending Your Own Structure
For the last task of this lab, make up some arbitrary fields to send once per minute. Include at least three data types, e.g. 8-bit integer, string, 32-bit float. Keep your payload under 51 bytes. Cite all code that isn’t yours.
Note that you should input your own data to your packet format instance (for example, using memcpy). Your decoder should match the packet format on Arduino so that the “Live Data” on TTN show the correct decoded payload.
There is a Datatype Intro available.
Submission
Submit a one-page report describing the challenges you faced during the lab At the end of this report, please include the following as appendices in the same document. Either text form or screenshot form is fine unless specified.
-
Your Arduino program (
ttn-otaa-highlevel.inoand any new code files. Do not submit yourkeys.h.) -
Your decoder function on the TTN Console
-
A screenshot of the “Live data” area of the TTN console showing a few successful transmissions.