Introduction
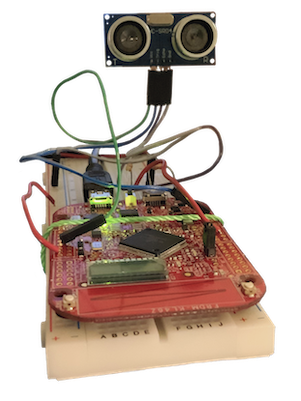
Our project implements a music game with touch and distance sensors and the board (similar to Taiko no Tatsujin). While looking at the “notes” they need to play next on the game UI on computer, the player needs to touch the left or right side of the touch slider as well as moving their hands towards or away from the distance sensor at the right time to match the beat/melody. These actions would generate the corresponding sound effects and score.
Video
System Overview
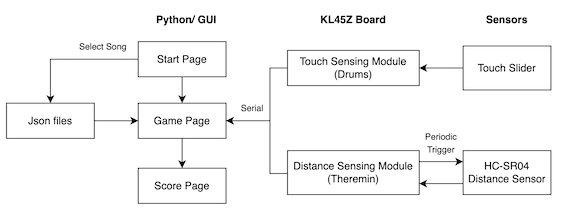
Our system receives input from the touch bar on the board and a distance sensor that reads data on percussion (beats) and melody (frequencies), respectively. The touch bar is configured to distinguish positions on the left and right side of the touchbar as well as each individual taps (instead of continuous signals) and outputs “left” or “right” whenever a signal is received. The HC-SR04 distance sensor first receives a 10us trigger input from the board, then returns a signal of a certain duration from which the distance could be calculated. In order to make sure both inputs are received in real-time, we will also employ concurrency to receive data from both input sources continuously until the main process is ended.
The GUI component of our project is coded in pygame and displayed on a computer. The main game page reads in information about the song from a json file (which specifies the frequency/position, start time, and duration of all notes), displays them as sliding blocks/circles across the screen, and increases the score when the user has tapped the drums/played a certain note on the theremin at the right time and frequency. Sound of the corresponding frequency would be played using the pyaudio library. We will also use multithreading to update the GUI and read in data from the serial port concurrently.
System Description
Diagram
Hardware
Capacitative Touch Slider
Since the capacitive touch slider is provided on the board, there is no additional hardware setup. We used the reference code (“Touch bar” below) to set up the required configurations and get the data. After examining the data, we set the data range for a single touch to be considered as touch on the left or on the right. Additionally, to make sure data is not read when there is no touch or when the data are continuous due to a single touch, a “prev” variable is used to record the previous data and a “time” variable is used to reject repeated data, respectively. There is a delay between each scan to get the data. When we are getting the value from a scan of the slider, interrupt is also disabled to avoid unwanted change of data.
Distance Sensor
Our hardware setup is similar to the setup in “Distance Sensor Hardware Setup” below, where a key point is the voltage divider to make sure echo input to GPIO is about 3.3V. Since the original echo signal is 5V, a 18k ohm and a 33k ohm resistor is used. The P5V-USB port would provide 5V to the VCC, and other GPIO ports would be 3.3V.
Software
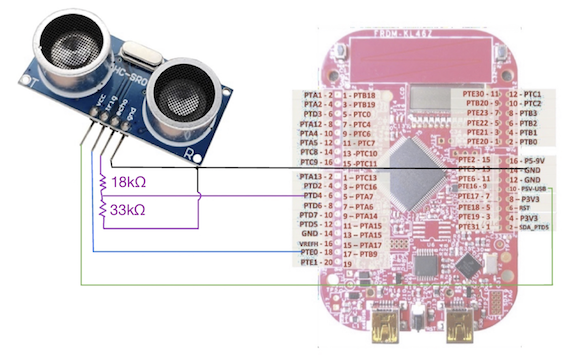
To initialize the sensor, PTE0 and PTD4 are set up as GPIO in the corresponding registers. Clocks to the ports are enabled. PTE0 is set up as trig output and PTD4 is set up as echo input. NVIC is configured to enable interrupts. A trigger output pulse is sent by configuring PSOR and PCOR registers, with a delay before turning off the trigger. Then inside a while loop that represents the sampling interval of the input, a count variable increments whenever the corresponding data field of PTD4 reads 1. When “count” is calculated to get echo data, interrupts are disabled to avoid unwanted change of data. Based on the count variable, the echo input data are put into 10 levels to represent the 10 theremin frequencies. This information is sent to the computer and the trig-echo process is repeated in a while loop.
To send data from both the touch sensor and distance sensor to the computer, concurrency is set up based on the code from lab 3. Two concurrent processes are created in the main function of our start.c file, one for the touch sensor and the other for the distance sensor.
Testing
Touch bar function and serial port
- Print out output from the touch bar to test if left and right are distinguishable and the cutoff values are set correctly
- Adjust parameters so that short touches are distinguishable
- Adjust parameters so that long touches are recognized as one input instead of multiple
Distance sensor
- Test if the sensor outputs data continuously
- Test by placing objects at different lengths to see if maximum and minimum distances are maintained as specified by the parameters
- Test if the console prints correct frequency level based on the data
- Connect with computer through serial to test if outputs appropriate sound and frequency
Concurrency
- The above tests work when both the touch sensor and the distance sensor are sending data
Python and GUI: reading and displaying files
- Static portion: read and parse musical notes from different source json files, then display them as tiles of different lengths moving across the screen to check if they are in the right positions
- Print out data obtained from the board and compare their values
- Integrate with sensors: tests are explained above; screen indicates that a drum or a frequency level is being played
- Starting page, song selection page, and ending page display and connects with each other correctly
- Tested different scenarios (all wrong keys, partially right, all right, etc.) to see if scores are updated correctly and the final score shown is correct
Work Distribution
The initial plan and the code for the capacitive touch slider are done by both of us. While Tenny figured out how to use the serial port and did most of the GUI in Python and Ziqi wrote most of the code for the distance sensor and set up concurrency in C, we helped modify each other’s code and setup whenever one encountered a problem. Specifically, we met frequently to discuss and debug together. Thus each of us has a solid understanding of every aspect of the project and did about an equal amount of work. text.
Resources
Sound Resources:
- https://freesound.org/people/YellowTree/sounds/422679/
- https://freesound.org/people/YellowTree/sounds/405368/
Images:
- https://gamerant.com/taiko-no-tatsujin-the-drum-master-worth-playing-anime-style/
- https://wallpapercave.com/w/wp10468306
Distance Sensor Hardware Setup:
- https://community.element14.com/products/devtools/kinetiskl2freedomboard/w/documents/10855/codewarrior-tutorial-for-frdm-kl25z-arduino-ultrasonic-ranging-with-the-freescale-freedom-board
Example code:
Touch bar
- https://forum.digikey.com/t/using-the-capacitive-touch-sensor-on-the-frdm-kl46z/13246
Serial port: example provided at
- https://canvas.cornell.edu/courses/35750/pages/serial-code-example?module_item_id=1374063
Pyaudio
- https://stackoverflow.com/questions/8299303/generating-sine-wave-sound-in-python/27978895#27978895
- https://forum.dangerousthings.com/t/rfid-theremin-turn-your-implant-into-a-crap-musical-instrument/7033
Other
- Reference manual
- Course code provided for Lab 3