Ryan's ECE 4960 Site
Lab 13
For our final lab, our task was to combine everything we've learned and built so far to accomplish the task of navigating through a set of way points in an environment.
The MVP Strategy
To accomplish this task, I decided to start off with a Minimum Viable Product (MVP) strategy
that could accomplish the task of navigating the waypoints in as simple a manner as possible.
After finishing the MVP, I would then add on more additions with the time I have left. I felt
that this would be the most efficient way to use my time, especially during Finals season when
time is very limited; the last time I want is to get stalled on an overly ambitious idea with
a low chance of success.
With this in mind, I decided to build my strategy around my robot's strengths that I've learned in the previous labs,
namely closed-loop PID translational movements and very reliable open-loop turning.
Since the robot wasn't very good at localization as I've learned in Lab 12, I decided
to not include it in my MVP strategy for now.
Based on this, my strategy would be to simply
execute a series of pre-defined steps that are either: using PID to do translational movements or using open-loop
turning to rotate. However, these two actions do have their limitations.
From previous labs, I've learned that PID and the ToF sensors do not work very
well for 1) long distances and 2) acute angles to walls. Both these limitations appear on the first
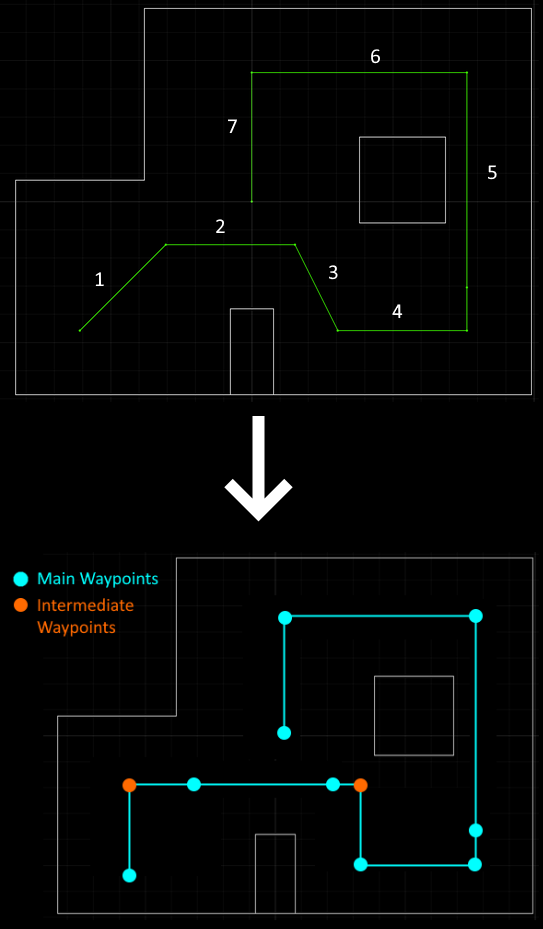
traversal on the diagram in the lab webpage (also shown below) and the angle limitation appears a bit on the third traversal.
I've also learned in previous labs that it is very difficult to tune open-loop turning with anything besides
90-degree turns, and again traversals 1 and 3 have this limitation. Because of this, I modified the recommended
path to only use 90-degree turns while still hitting the target waypoints, which can be seen below:

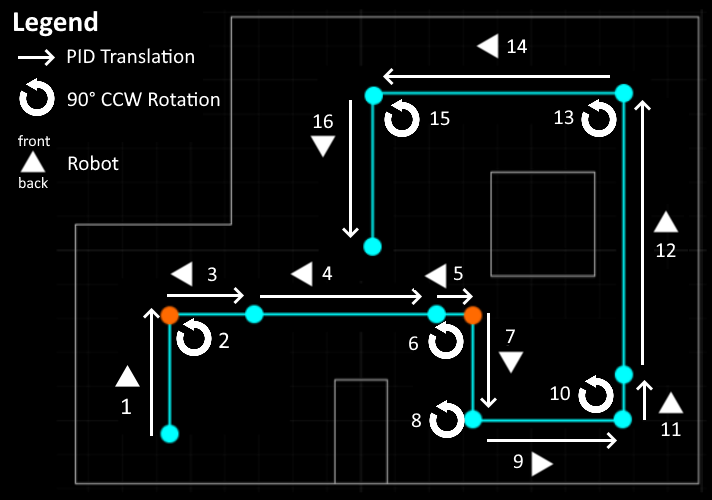
With these limitations resolved, I then planned out the sequence of steps to accomplish the lab's task. This sequence is illustrated below:

Note that for steps 3-5, the robot is traversing backwards. This is to solve two problems:
1) the ToF sensors work worse for long distances and 2) when the robot is facing the
right hand side, sometimes the ToF sensor picks up the top-right box instead of the wall if it is
angled up even a little bit. Making the left wall the reference for the PID solves both these
issues. In hindsight, the robot also should have been traversing backwards for step 16 since the upper wall
is a much better reference than the small lower box, but this ended up not being an issue
in the full run as can be seen in the video below.
After planning out this sequence, I then began writing the code to implement it. My overall
strategy was to make the computer-Python side the "controller" issuing the steps in the sequence to the robot.
This way, the localization code in Lab 12 fits in a bit better. The robot will then recieve and physically
perform the steps issued to it. This required Bluetooth communication, and I reused the SEND_THREE_FLOATS command
in lab 2 as the core of my command code. Specifically, the first float denotes the command (1 = observation loop,
2 = rotate clockwise, 3 = PID forward, 4 = rotate counter-clockwise). The next two floats carry any data for the command.
I created four helper functions for each of these steps:
          def measure(rotation):
              # Get Observation Data by executing a 360 degree rotation motion
              loc.get_observation_data(rot_vel = rotation)
              # Run Update Step
              loc.update_step()
              loc.plot_update_step_data(plot_data=True)

          def single_rotate_cw(duration):
              ble.send_command(CMD.SEND_THREE_FLOATS,"2|"+str(duration)+"|0")
              time.sleep(1)

          def single_rotate_ccw(duration):
              ble.send_command(CMD.SEND_THREE_FLOATS,"4|"+str(duration)+"|0")
              time.sleep(1)

          def pid_forward(target_distance,duration):
              ble.send_command(CMD.SEND_THREE_FLOATS,"3|"+str(target_distance)+"|"+str(duration))
              time.sleep(6)
With these helper functions, I then wrote out the sequence of steps to complete the waypoint navigation:
          pid_forward(470,5000)
          single_rotate_ccw(rot_ccw_dur)
          pid_forward(1000,5000)


          pid_forward(2050,5000)
          time.sleep(1)

          pid_forward(2200,5000)
          single_rotate_ccw(rot_ccw_dur)
          pid_forward(300,5000)

          single_rotate_ccw(rot_ccw_dur)
          pid_forward(470,5000)

          single_rotate_ccw(rot_ccw_dur)
          pid_forward(2000,5000)
          time.sleep(1)

          pid_forward(470,5000)

          single_rotate_ccw(rot_ccw_dur)
          pid_forward(760,5000)

          single_rotate_ccw(rot_ccw_dur)
          pid_forward(1000,5000)
Next, I worked on the robot-Arduino side of the code. To handle the commands issued to it, I created a rudamentary state machine:
          while (central.connected()) {
          if(robot_state == 0){
            Serial.println("listening for command");
            read_data();
          }else if(robot_state == 1){
            Serial.println("measuring");
            collect_data();
          }else if(robot_state == 2){
            Serial.println("sending data");
            motor_forward(0);
            digitalWrite(19,HIGH);
            send_logged_data_2();
            digitalWrite(19,LOW);
          }else if (robot_state == 4){
            Serial.println("rotate");
            rotate_cw(single_rotate_duration,130);
          }else if(robot_state == 5){
            Serial.println("pid");
            botPID(pid_target_distance, pid_duration);
          }else if (robot_state == 6){
            Serial.println("rotate");
            rotate_ccw(single_rotate_ccw_duration,130);
          }
        }
These states were set by the handle_command() function reused from Lab 2. Specifically, I just modified the SEND_THREE_FLOATS case with this small addition:
          wp_command = (int) float_a;
          if(wp_command == 1){
            robot_state = 1;
            rotation_duration = (int) float_b;
          }else if(wp_command == 2){
            robot_state = 4;
            single_rotate_duration = (int) float_b;
          }else if(wp_command == 3){
            robot_state = 5;
            pid_target_distance = (int) float_b;
            pid_duration = (int) float_c;
          }else if(wp_command == 4){
            robot_state = 6;
            single_rotate_ccw_duration = (int) float_b;
          }
The state machine calls many functions that were defined in previous labs, such as botPID() from Lab 6 and collect_data() from Lab 9. However, there is also an additional single rotation function now:
          int rotate_ccw_state = 0;
          unsigned long rot_ccw_timestamp = 0;
          int single_rotate_ccw_duration = 0;
          void rotate_ccw(int duration, int magnitude){
            if(rotate_ccw_state == 0){
              rot_ccw_timestamp = millis();
              rotate_ccw_state ++;
            }else if(rotate_ccw_state == 1){
              analogWrite(A16,0);
              analogWrite(A15,magnitude);
              analogWrite(4,0);
              analogWrite(A5,magnitude);

              if(millis() - rot_ccw_timestamp > duration){
                motor_forward(0);
                rotate_ccw_state = 0;
                robot_state = 0; // listen for command again
              }
            }
          }
Once I was finished with the code, I ran a test which went surprisingly well:
Despite the run going very well, there are a few things that can be improved. The first is that the linear PID movements were slightly off. However, this isn't because the PID was bad, rather it was because I eyeballed the last few PID target distances since I honestly didn't expect the robot to get that far. The second is that although the open-loop rotations worked well enough for this lab, it would have been better if they were closed-loop since it would've made the rotations more consistent. This was especially obvious in my last few tests where I noticed that removing the dust on my wheels made the open-loop turns significantly less consistent. However, like I said in Lab 9, my ICM was likely broken and I did not have enough time to replace it to perform closed-loop rotations.
With Localization
Once, I was finished with the MVP strategy, I decided to add in localization. However, since the localization isn't very accurate as I learned in Lab 12, it doesn't actually play a role in how the robot chooses to navigate the environment. Instead, I am still using the sequence of steps strategy, with localization code added in to plot the robot's beliefs as it navigates the environment:
          measure(175) # measure waypoint 1

          pid_forward(470,5000)
          single_rotate_ccw(510)
          pid_forward(1000,5000)
          measure(measure_rot_dur) # measure waypoint 2

          pid_forward(1950,5000)
          measure(measure_rot_dur) # measure waypoint 3

          pid_forward(2200,5000)
          single_rotate_ccw(rot_ccw_dur)
          pid_forward(300,5000)
          measure(measure_rot_dur) # measure waypoint 4

          single_rotate_ccw(385)
          pid_forward(470,5000)
          measure(measure_rot_dur) # measure waypoint 5

          single_rotate_ccw(rot_ccw_dur)
          pid_forward(2000,5000)
          measure(measure_rot_dur) # measure waypoint 6

          pid_forward(470,5000)
          measure(measure_rot_dur) # measure waypoint 7

          single_rotate_ccw(rot_ccw_dur)
          pid_forward(760,5000)
          measure(measure_rot_dur) # measure waypoint 8

          single_rotate_ccw(rot_ccw_dur)
          pid_forward(1000,5000)
          measure(measure_rot_dur) # measure waypoint 9
Unfortunately, since the observation loops also use open-loop turning, the addition of the localization added in more chances for the error to accumulate. However, despite that, the robot still manages to do a surprisingly good job figuring out its beliefs as can be seen in this video (especially towards the end):
After a few tries, this was the best proper run I got with the localization:
And with that, I have finished Fast Robots. Thank you to the awesome course staff and the support they've provided throughout this class. Despite the hiccups, I found everything very interesting and rewarding, and it is easily my favorite class of this semester.